Wie man benutzerdefinierte GTM-Container mit Growform verwendet
Google Tag Manager (GTM) ist ein äußerst leistungsfähiger “Tag-Manager”, mit dem Sie auf einfache Weise Standard- und benutzerdefinierte Tags zu Ihrer Website oder Ihrem Formular hinzufügen können.
Um Ihnen einige Beispiele dafür zu geben, was Sie mit benutzerdefinierten GTM-Containern tun können, können Sie:
- Ein Pixel-Ereignis auslösen, wenn Benutzer einen bestimmten Schritt erreichen oder das Formular ausfüllen
- Auslösen einer Google-Anzeigenumsetzung, wenn Nutzer auf eine bestimmte Schaltfläche klicken
- Verwenden Sie einen Screenrecorder wie Fullstory, um zu sehen, wie sich Ihre Benutzer innerhalb Ihres Formulars verhalten
- So ziemlich alles, was Sie sich vorstellen können!
Inhaltsverzeichnis
🎉 This guide is available in video form!
This 13 minute video walks you through every little step you need to get your Google Tag Manager containers set up with Growform:
Once you’ve finished the video, head to the bottom of this post to see what you can do next.
A quick refresher on the main GTM concepts
Before we get started, here’s a quick refresher on the main GTM concepts:
- A container is a distinct “area” or repository that holds tags, triggers and variables. Containers are versioned, and GTM has a handy version control system to let you “rewind” if you mess something up.
- A tag is a piece of code that should fire when something happens. GTM has a library of standard tags you can use (like Google Ads), but you can also add your own custom HTML tags. Using standard tags is often advisable, as it introduces less complexity and room for error.
- A trigger is the “when” a tag should fire. Common use-cases are “All page views”, or when a certain button is clicked. When a particular condition (or set of conditions) is met, the trigger is activated and all tags under that trigger are fired.
- A variable is a small piece of storage inside GTM that makes it easy to use and re-use data. As an example, we store the form ID inside a GTM variable to make it easy to reuse and insert into your own tags.
Growform actually uses two containers rather than one, which is explained in the following section…
Read This First: The Ridiculously Complicated Issues Caused By iFrames, And Why Growform Uses Two Containers
Like many embedded code snippets, Growform runs inside an iFrame to make sure it doesn’t mess with your website (and vice-versa).
This beautiful illustration shows captures it nicely:
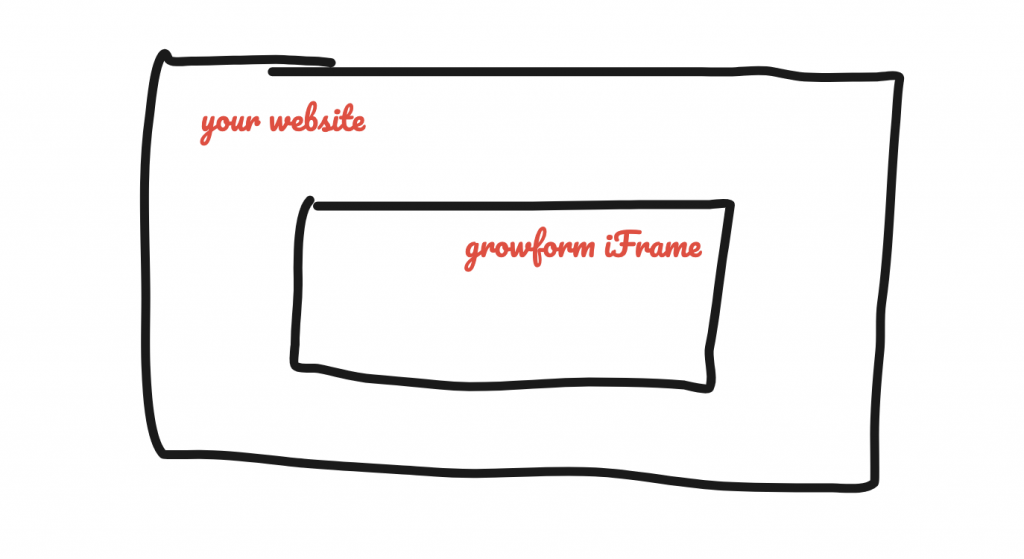
An iFrame is like its own browser window.
The iFrame cannot see anything on your website, and your website cannot see anything inside the iFrame.
They are effectively two distinct websites.
This poses serious issues for tracking – especially since most advertising partners will not function inside an iFrame.
To navigate around this challenge, we’ve consulted some super advanced GTM experts and created two GTM containers – which we’ve made ready for you to download and import into your own GTM account:
- A child container. The child container’s job is to keep track of what’s happening inside your form and send it up to the parent container. It can also be a useful place to fire tags that need to “see” inside the iFrame, like screen recording apps.
- A parent container that receives events from the child container and actually fires the tags.
So, we can add a child and parent container to our diagram as follows, with an arrow representing communication between the two containers:
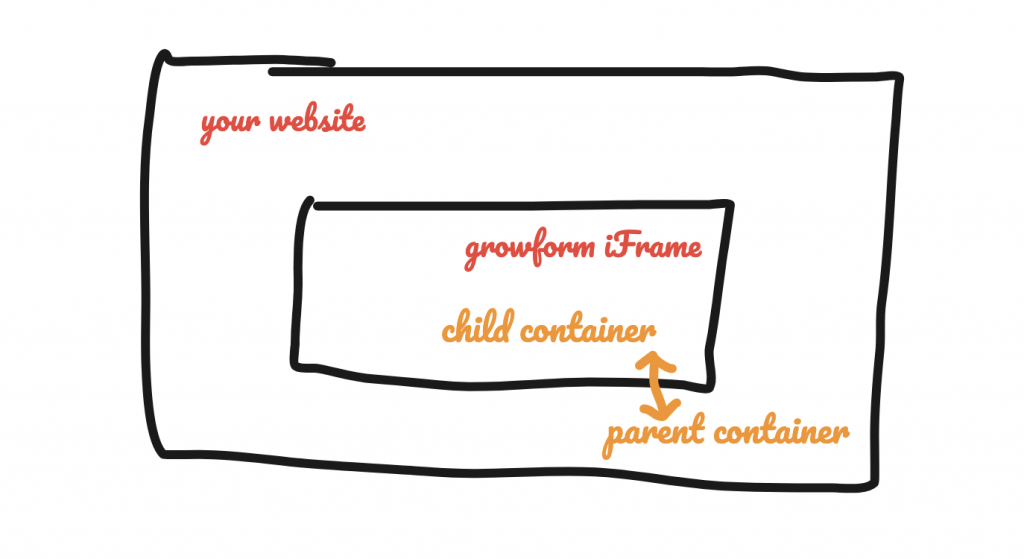
To recap:
- Growform forms run inside an iFrame. Trying to insert tags into iFrames and getting them to work is doomed for failure.
- To get around this problem, we’ve created a parent and a child container for you.
- The child container picks up on things happening inside the iFrame and sends information to the parent container.
- The parent container receives the information from the child container and fires the actual tag… and the tag actually works.
- We’ve created these containers and made them available for download to act as a “starting point” for your tagging adventures.
It sounds complicated, but we’ll walk you through a couple of examples to get you firing tags in no time.
Here’s how to get set up…
1 – Create or log into your Google Tag Manager account
First, navigate to Google Tag Manager and create a new account if you do not have one already.
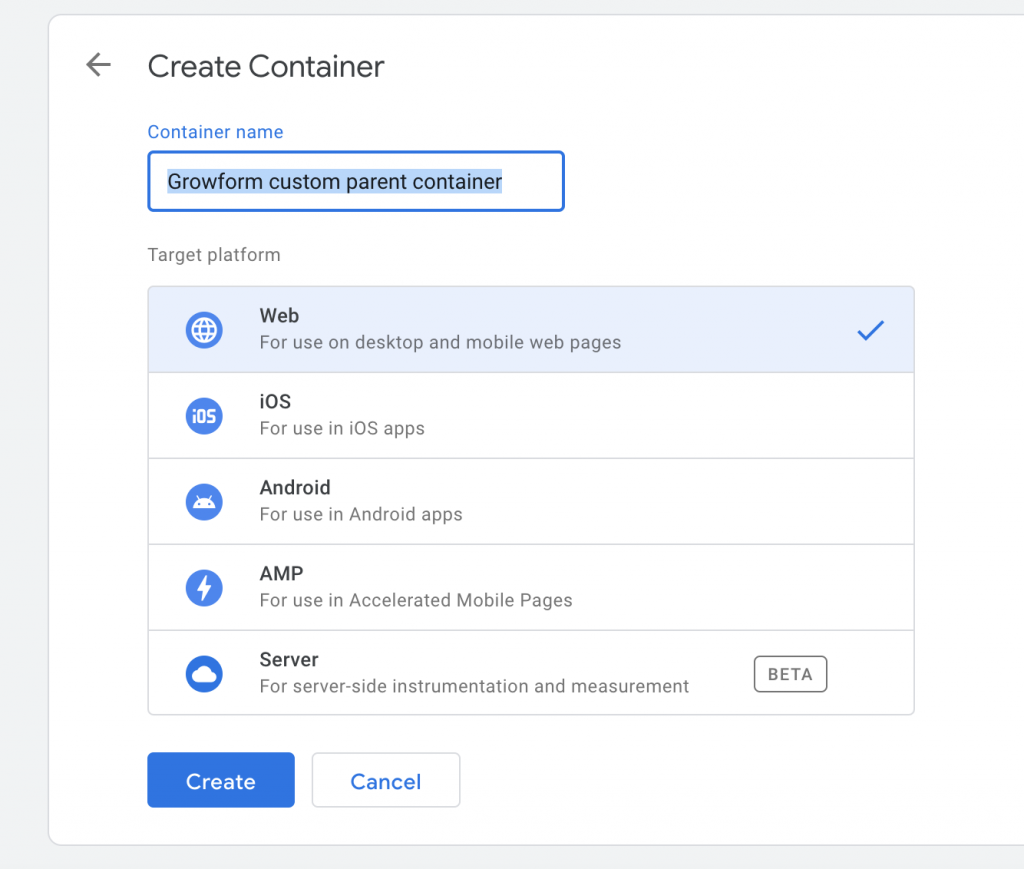
You may need to create an account inside Google Tag Manager once you’re set up too – at which point you should click the “three dots” menu on your account and hit “Create container”.
You should now create two containers – A parent container and child container, and both should be set to “Web” as the target container:
2 – Download our starter parent and child containers
You can download our parent and child “starter” containers here:
💾 Growform parent container
💾 Growform child container
Don’t delete or change any tags, variables or triggers that come with the starter containers (unless you really know what you’re doing) – your containers rely on these to function properly.
3 – Import our parent and child containers to your GTM account
Now you have our containers downloaded, it’s time to import them into the brand new, blank containers that you created in step 1.
Open up your parent container and navigate to “Admin”, then hit “Import container”. You’ll see a screen like this:
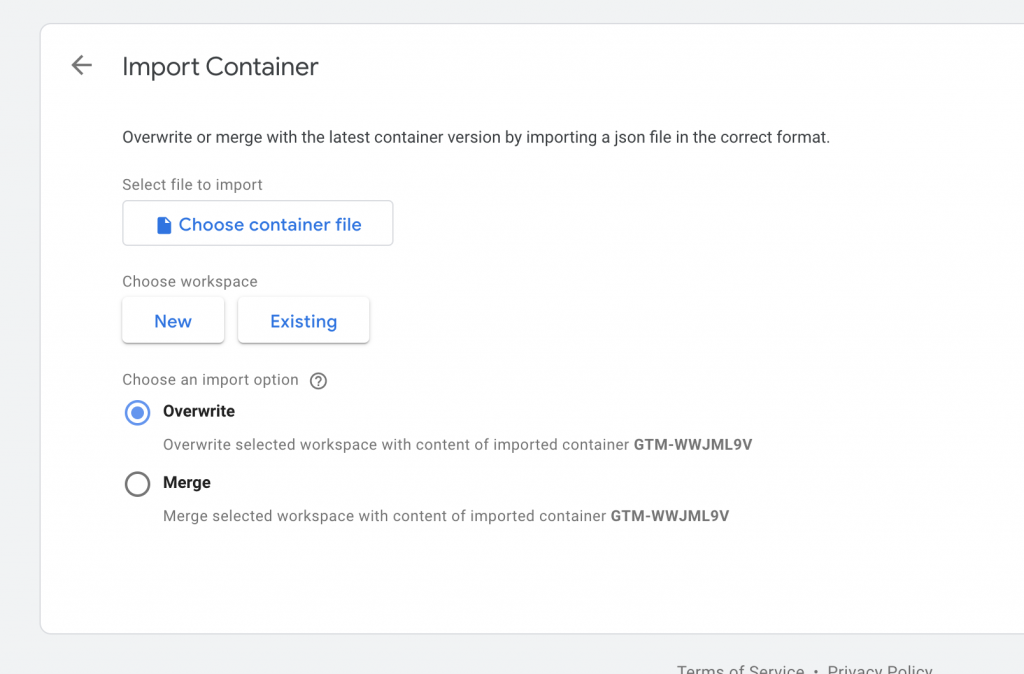
Select the growform-parent-container.json (downloaded in step 2), and choose “existing workspace”, then “Default workspace”. You’re safe to use the overwrite option, as your container was blank anyway.
You should now repeat this process for the child container, so you have both a child container and parent container in your account, populated with the tags and variables we set up for you.
4 – Publish your containers and add them to your Growform form
Hit “Submit” on both of your containers so they’re published:
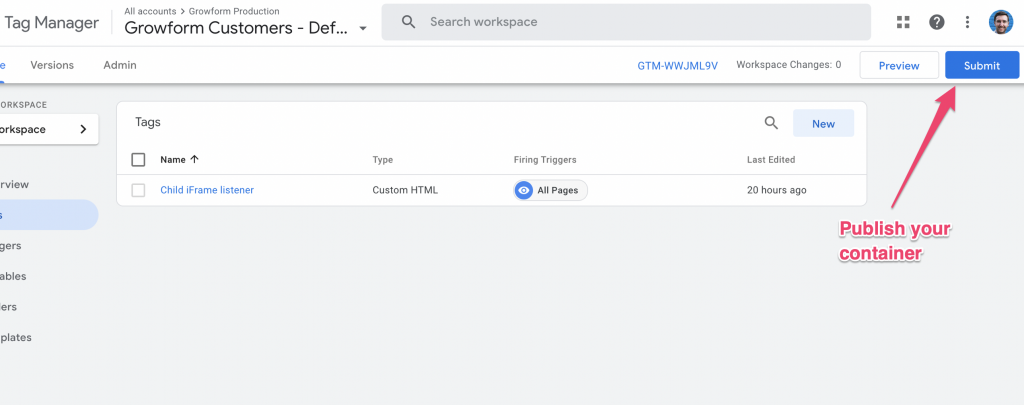
Now your containers are published, they’re in a working state and ready to be added to your Growform form.
Navigate to your form in Growform, hit “Form settings” and then “Tracking & Tagging”. Find the Google Tag Manager box and copy your parent and child container IDs into each. Don’t forget to hit save!
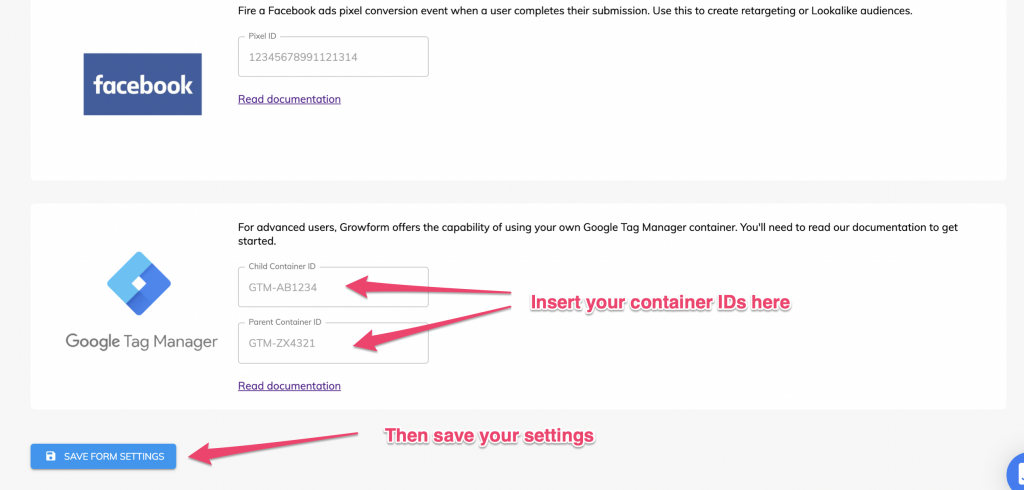
At this point, you have an exact copy of the “default” containers we use under the hood to fire the other tags (like Facebook and Google Ads).
This means any other settings you have on the tracking & tagging settings page will still work – but will be fired by your custom container, rather than ours. Cool, huh!
By the same token, it also means this form’s firing functionality is dependent on your GTM containers staying intact, so be careful with the containers, and don’t remove anything that’s already there.
What next?
Now you’ve made it through the basic setup, you’re ready to start firing some tags.
Read our guides below to get to get started with some real life use-cases:
How to fire a tag when a user changes step or completes the form
How to fire a tag when a user presses a certain button
How to fire a screen recording tag or similar
Frequently asked questions
Due to the way React works, it can be difficult to use class selectors (.classnames) to target particular elements, so we recommend following this guide if you wish to target a button.
If you want to target some other element, you can always contact support and we’ll be able to target pretty much anything.
Tags should almost always be fired in the parent container: the child container’s job is simply to “tell” the parent container about what’s happening inside Growform’s iFrame, so tags can be fired outside it, in the parent.
For a basic guide to firing your first tag, see here.
Eugh, we know. It’s just part and parcel of working with iFrames.
In theory, you could create your own child container from scratch and add it to your Growform settings.
But this would be next to useless, as tags would only fire inside the iFrame.
By using our “starter” containers, you get access to a bunch of functions and tags that will let you do everything you need to do.
Once you add the our starter containers, Growform will pass the details from your tracking & tagging settings page into your new containers, and everything will function as normal - as long as you keep the containers intact, which are now doing the heavy lifting!
There are 2 approaches when working with multiple forms:
a.) Use the same containers for all forms: This is a perfectly viable option. The form ID and other information is available inside GTM, so you can build logic about what to fire when inside Google Tag Manager. This works particularly well if your forms have similar purposes.
b.) Use different containers for different forms: If you’re managing multiple clients, you can always create a new account for each client. This keeps their tags completely separate and is better for to avoid cross-contamination of tags.
Need help with custom GTM containers? Our team are experienced in advanced tracking & tagging and able to help via online chat within your account.
Recent Posts
- Anatomie einer Landing Page: 12 wesentliche Elemente für höhere Konversionen
- 8 beste Webinar Landing Page Beispiele für mehr Anmeldungen
- 10 beste ClickFunnels Landing Page Beispiele, die tatsächlich konvertieren
- Wie Sie die Landing Page-Optimierung verbessern und die Konversionen steigern können
- Landing Page Metriken, die wichtig sind: 12 KPIs zur Steigerung der Konversionen
