Comment utiliser des conteneurs GTM personnalisés avec Growform
Google Tag Manager (GTM) est un « gestionnaire de balises » extrêmement puissant, qui vous permet d’ajouter facilement des balises standard et personnalisées à votre site web ou à votre formulaire.
Pour vous donner quelques exemples de ce qui peut être fait avec les conteneurs GTM personnalisés, vous pouvez.. :
- Déclencher un événement pixel lorsque les utilisateurs atteignent une certaine étape ou remplissent le formulaire
- Déclencher une conversion dans les annonces Google lorsque les utilisateurs cliquent sur un bouton particulier
- Utilisez un enregistreur d’écran comme Fullstory pour voir comment vos utilisateurs se comportent à l’intérieur de votre formulaire.
- Pratiquement tout ce à quoi vous pouvez penser !
Table of Contents
🎉 This guide is available in video form!
Cette vidéo de 13 minutes vous guide à travers toutes les petites étapes nécessaires pour configurer vos conteneurs Google Tag Manager avec Growform :
Une fois que vous aurez terminé la vidéo, rendez-vous au bas de cet article pour voir ce que vous pouvez faire ensuite.
Rappel rapide des principaux concepts du GTM
Avant de commencer, voici un bref rappel des principaux concepts de GTM :
- Un conteneur est une « zone » distincte ou un dépôt qui contient des balises, des déclencheurs et des variables. Les conteneurs sont versionnés, et GTM dispose d’un système de contrôle de version pratique qui vous permet de « revenir en arrière » si vous vous trompez.
- Une balise est un morceau de code qui doit se déclencher lorsque quelque chose se produit. GTM dispose d’une bibliothèque de balises standard que vous pouvez utiliser (comme Google Ads), mais vous pouvez également ajouter vos propres balises HTML personnalisées. Il est souvent conseillé d’utiliser des balises standard, car elles sont moins complexes et laissent moins de place à l’erreur.
- Un déclencheur est le « quand » qu’une balise doit déclencher. Les cas d’utilisation les plus courants sont « Toutes les pages vues » ou lorsqu’un certain bouton est cliqué. Lorsqu’une condition particulière (ou un ensemble de conditions) est remplie, le déclencheur est activé et toutes les balises sous ce déclencheur sont activées.
- Une variable est un petit élément de stockage dans GTM qui facilite l’utilisation et la réutilisation des données. Par exemple, nous stockons l’ID du formulaire dans une variable GTM pour faciliter sa réutilisation et son insertion dans vos propres balises.
Growform utilise en fait deux conteneurs au lieu d’un, ce qui est expliqué dans la section suivante…
Lisez d’abord ceci : Les problèmes ridiculement compliqués causés par les iFrames, et pourquoi Growform utilise deux conteneurs
Comme de nombreux extraits de code intégrés, Growform fonctionne à l’intérieur d’une iFrame pour s’assurer qu’il ne perturbe pas votre site web (et vice-versa).
Cette belle illustration le montre bien :
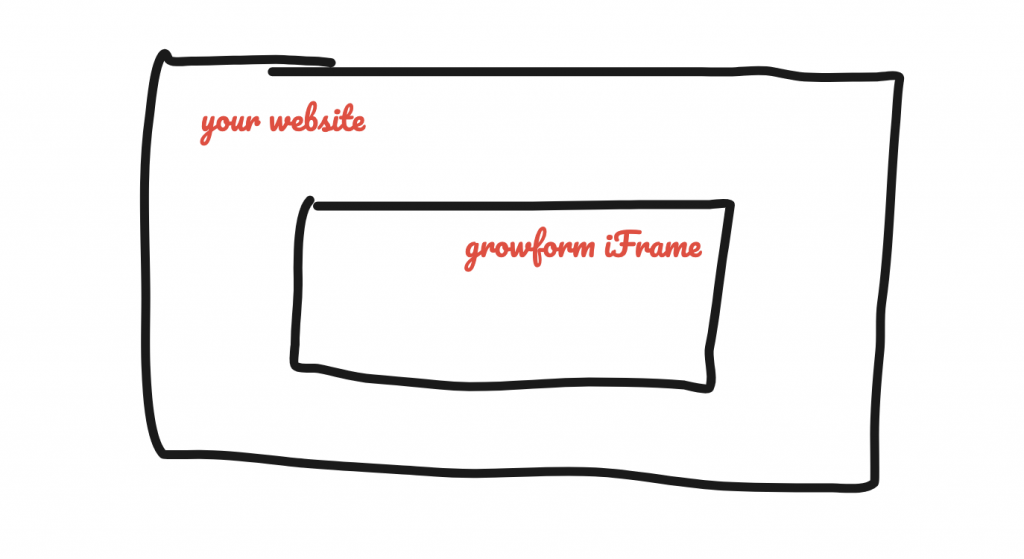
Un iFrame est comme sa propre fenêtre de navigateur.
L’iFrame ne peut rien voir sur votre site web, et votre site web ne peut rien voir à l’intérieur de l’iFrame.
Il s’agit en fait de deux sites web distincts.
Cela pose de sérieux problèmes pour le tracking – d’autant plus que la plupart des partenaires publicitaires ne fonctionneront pas à l’intérieur d’un iFrame.
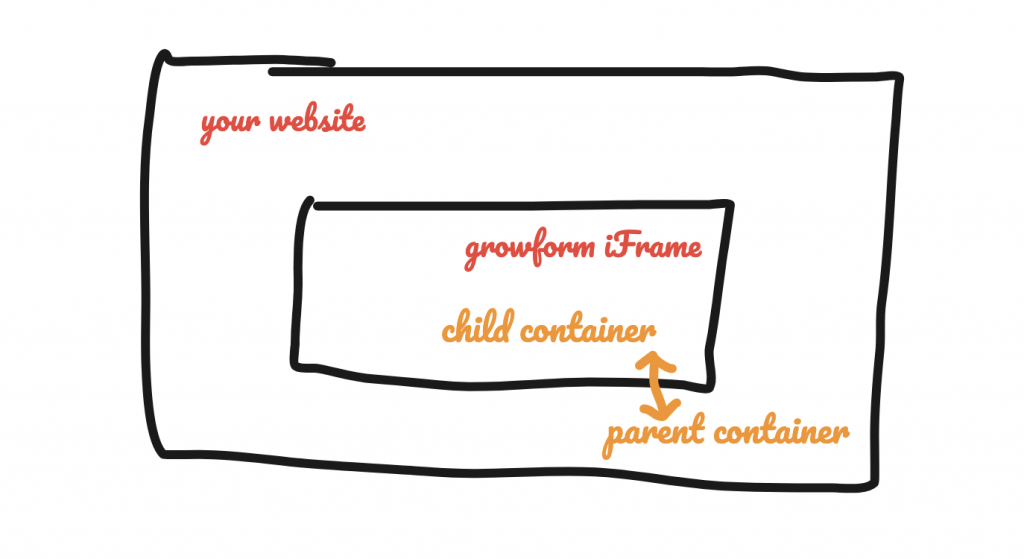
Pour contourner ce défi, nous avons consulté des experts GTM très avancés et créé deux conteneurs GTM – que nous avons mis à votre disposition pour que vous puissiez les télécharger et les importer dans votre propre compte GTM :
- Un conteneur enfant. Le rôle du conteneur enfant est de garder une trace de ce qui se passe à l’intérieur de votre formulaire et de l’envoyer au conteneur parent. Il peut également être utile pour envoyer des balises qui doivent « voir » à l’intérieur de l’iFrame, comme les applications d’enregistrement d’écran.
- Un conteneur parent qui reçoit les événements du conteneur enfant et déclenche les balises.
Nous pouvons donc ajouter un conteneur enfant et un conteneur parent à notre diagramme comme suit, avec une flèche représentant la communication entre les deux conteneurs :
Récapitulons :
- Les formulaires Growform s’exécutent à l’intérieur d’une iFrame. Essayer d’insérer des balises dans des iFrames et les faire fonctionner est voué à l’échec.
- Pour contourner ce problème, nous avons créé un conteneur parent et un conteneur enfant pour vous.
- Le conteneur enfant capte ce qui se passe à l’intérieur de l’ iFrame et envoie des informations au conteneur parent.
- Le conteneur parent reçoit les informations du conteneur enfant et déclenche la balise proprement dite… et la balise fonctionne réellement.
- Nous avons créé ces conteneurs et les avons mis à disposition pour les télécharger afin qu’ils servent de « point de départ » à vos aventures de marquage.
Cela peut sembler compliqué, mais nous allons vous présenter quelques exemples qui vous permettront de lancer des balises en un rien de temps.
Voici comment procéder…
1 – Créez ou connectez-vous à votre compte Google Tag Manager
Tout d’abord, accédez à Google Tag Manager et créez un nouveau compte si vous n’en avez pas déjà un.
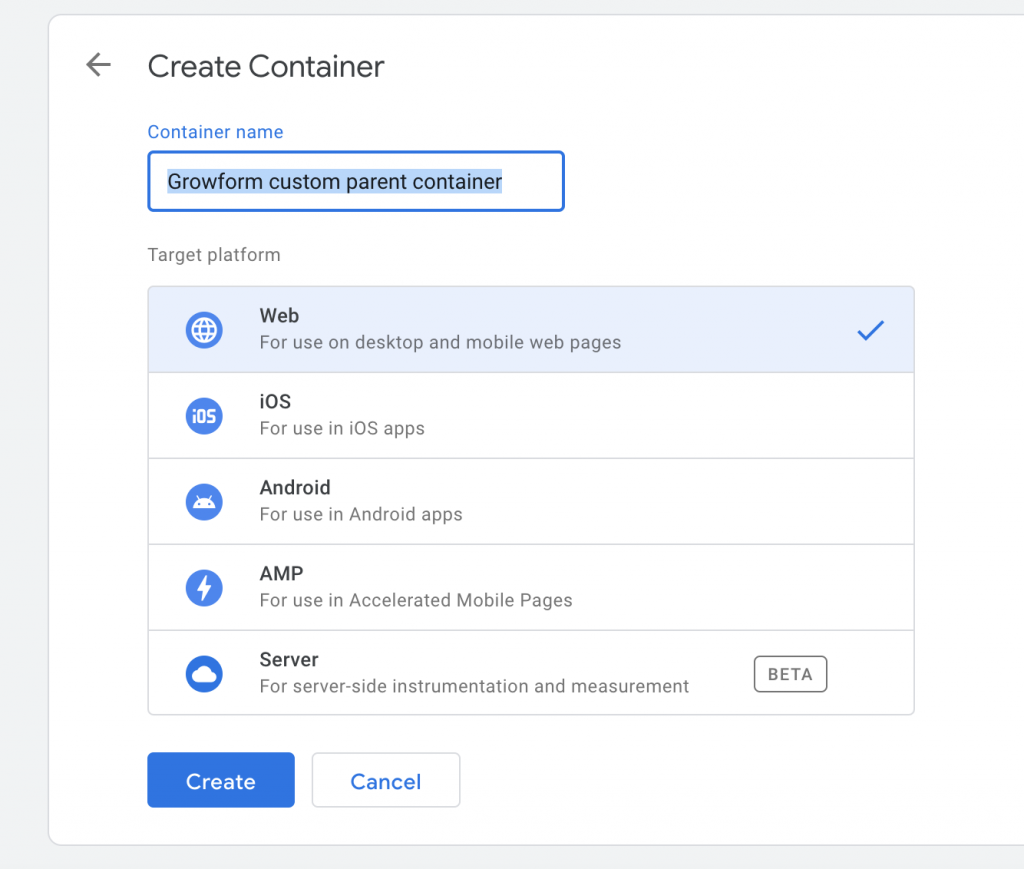
Il se peut que vous deviez créer un compte dans Google Tag Manager une fois que vous êtes installé – à ce moment-là, vous devez cliquer sur le menu « trois points » de votre compte et cliquer sur « Créer un conteneur ».
Vous devez maintenant créer deux conteneurs – un conteneur parent et un conteneur enfant, et les deux doivent être réglés sur « Web » en tant que conteneur cible :
2 – Téléchargez nos conteneurs parent et enfant de départ
You can download our parent and child « starter » containers here:
💾 Growform parent container
💾 Growform child container
Ne supprimez pas et ne modifiez pas les balises, les variables ou les déclencheurs fournis avec les conteneurs de démarrage (à moins que vous ne sachiez vraiment ce que vous faites) – vos conteneurs s’appuient sur ces éléments pour fonctionner correctement.
3 – Importez nos conteneurs parents et enfants dans votre compte GTM
Maintenant que vous avez téléchargé nos conteneurs, il est temps de les importer dans les nouveaux conteneurs vierges que vous avez créés à l’étape 1.
Ouvrez votre conteneur parent et naviguez jusqu’à « Admin », puis cliquez sur « Importer un conteneur ». Vous verrez un écran comme celui-ci :

Sélectionnez le fichier growform-parent-container.json (téléchargé à l’étape 2), et choisissez « existing workspace », puis « Default workspace ». Vous pouvez utiliser l’option d’écrasement en toute sécurité, car votre conteneur était vide de toute façon.
Vous devez maintenant répéter ce processus pour le conteneur enfant, afin d’avoir à la fois un conteneur enfant et un conteneur parent dans votre compte, alimentés par les balises et les variables que nous avons définies pour vous.
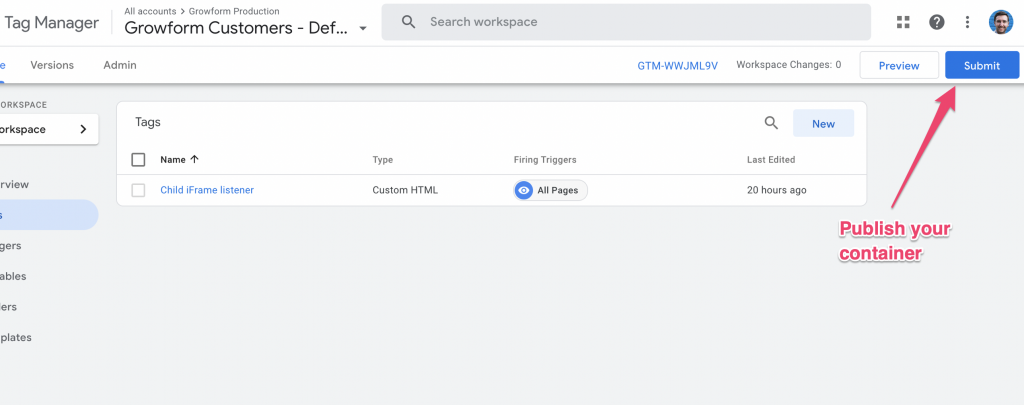
4 – Publiez vos conteneurs et ajoutez-les à votre formulaire Growform
Cliquez sur « Soumettre » pour vos deux conteneurs afin qu’ils soient publiés :
Maintenant que vos conteneurs sont publiés, ils sont en état de marche et prêts à être ajoutés à votre formulaire Growform.
Accédez à votre formulaire dans Growform, cliquez sur « Form settings » puis sur « Tracking & Tagging ». Trouvez la case Google Tag Manager et copiez les ID de vos conteneurs parent et enfant dans chacun d’entre eux. N’oubliez pas de sauvegarder !

À ce stade, vous disposez d’une copie exacte des conteneurs « par défaut » que nous utilisons sous le capot pour activer les autres balises (comme Facebook et Google Ads).
Cela signifie que tous les autres paramètres que vous avez définis sur la page des paramètres de suivi et de marquage fonctionneront toujours, mais seront déclenchés par votre conteneur personnalisé, plutôt que par le nôtre. Cool, hein !
De la même manière, cela signifie également que la fonctionnalité de déclenchement de ce formulaire dépend de l’intégrité de vos conteneurs GTM, donc soyez prudent avec les conteneurs et ne supprimez rien de ce qui s’y trouve déjà.
Quelle est la prochaine étape ?
Maintenant que vous avez terminé la configuration de base, vous êtes prêt à déclencher des balises.
Lisez nos guides ci-dessous pour démarrer avec des cas d’utilisation concrets :
Comment déclencher une balise lorsqu’un utilisateur change d’étape ou complète le formulaire ?
Comment déclencher une balise lorsqu’un utilisateur appuie sur un certain bouton ?
Comment déclencher une balise d’enregistrement d’écran ou similaire ?
Questions fréquemment posées
Due to the way React works, it can be difficult to use class selectors (.classnames) to target particular elements, so we recommend following this guide if you wish to target a button.
If you want to target some other element, you can always contact support and we’ll be able to target pretty much anything.
Tags should almost always be fired in the parent container: the child container’s job is simply to “tell” the parent container about what’s happening inside Growform’s iFrame, so tags can be fired outside it, in the parent.
For a basic guide to firing your first tag, see here.
Eugh, we know. It’s just part and parcel of working with iFrames.
In theory, you could create your own child container from scratch and add it to your Growform settings.
But this would be next to useless, as tags would only fire inside the iFrame.
By using our “starter” containers, you get access to a bunch of functions and tags that will let you do everything you need to do.
Once you add the our starter containers, Growform will pass the details from your tracking & tagging settings page into your new containers, and everything will function as normal – as long as you keep the containers intact, which are now doing the heavy lifting!
There are 2 approaches when working with multiple forms:
a.) Use the same containers for all forms: This is a perfectly viable option. The form ID and other information is available inside GTM, so you can build logic about what to fire when inside Google Tag Manager. This works particularly well if your forms have similar purposes.
b.) Use different containers for different forms: If you’re managing multiple clients, you can always create a new account for each client. This keeps their tags completely separate and is better for to avoid cross-contamination of tags.
Besoin d’aide avec les conteneurs GTM personnalisés ? Notre équipe est expérimentée dans le suivi et l’étiquetage avancés et peut vous aider par le biais d’un chat en ligne dans votre compte.