How To Track Google Ads Conversions With Unbounce
Are you looking to see Unbounce conversions inside Google Adwords, or need a way to trigger Google Ads conversion pixels from Unbounce? You’re in the right place!
In this comprehensive guide, we’ll dive into the world of Google Ads tracking on Unbounce, our favorite landing page builder. This guide is written from years of experience in both Unbounce and Google Ads, and has been tested to ensure maximum reliability.
By integrating Unbounce and Google Ads, you can effectively track conversions and optimize your campaigns for maximum ROI.
Table of Contents
Why track Google Ads conversions with Unbounce?
By integrating Unbounce and Google Ads, you can effectively track conversions and optimize your campaigns for maximum ROI. Conversion tracking is a vital component of any digital marketing strategy. It allows you to track valuable user actions, such as form submissions, purchases, or sign-ups that occur on your Unbounce landing pages.
With Unbounce, we usually wish to fire a conversion when a user submits a form, but we may also be interested in sending a conversion when the user reaches a certain page.
In any case, these actions are known as conversions, and tracking them is crucial for several reasons:
- Performance Measurement: Conversion tracking enables you to measure the performance of your campaigns and determine which ads, keywords, and landing pages are driving the most conversions. This information is invaluable for making informed decisions about where to invest your marketing budget and how to optimize your campaigns for maximum ROI.
- Optimization: Conversion data helps you identify areas for improvement within your campaigns. By understanding which ads, keywords, and landing pages are underperforming, you can make data-driven adjustments to your strategy and improve your overall campaign performance.
- Attribution: Conversion tracking allows you to attribute conversions to specific marketing efforts, enabling you to understand which channels or tactics are driving the most value for your business.
Now that we understand the importance of conversion tracking, let’s explore how to set it up!
Bird’s eye view: how the setup will work
Before jumping into the step-by-step guide, let’s quickly walk through how the setup will work. Try not to skip this bit – understanding the “why” will help you understand the “how” when you get to it later in this guide.
- First, We’ll grab some conversion tracking code from Google, which will tell Google when our campaigns have been successful
- We’ll add “global code” to all of our pages, which will help Google determine who our visitor is, even if they visit a view pages
- We’ll add Google’s event snippet only to our thank-you page, which only visitors who have filled in our form will see. This tells Google about the conversion. We’ll also fire the global code just above this to ensure both of the tags fire, and in the right order (a common mistake!)
- We’ll then set our form to redirect to our thank-you page on submission, therefore firing the pixel and tracking the conversion!
Step-by-step guide to tracking Google Ads conversions in Unbounce
Note: These instructions are correct as of April 2023, but Google often changes their interface – so you may need to account for minor adjustments.
1) Define a new conversion in Google ads
If you don’t have a conversion defined already, you’ll need to do this first.
a) Create a new conversion action: Click on the “Tools & Settings” menu (wrench icon) on the left side. Select “Goals”, and then “Summary”.
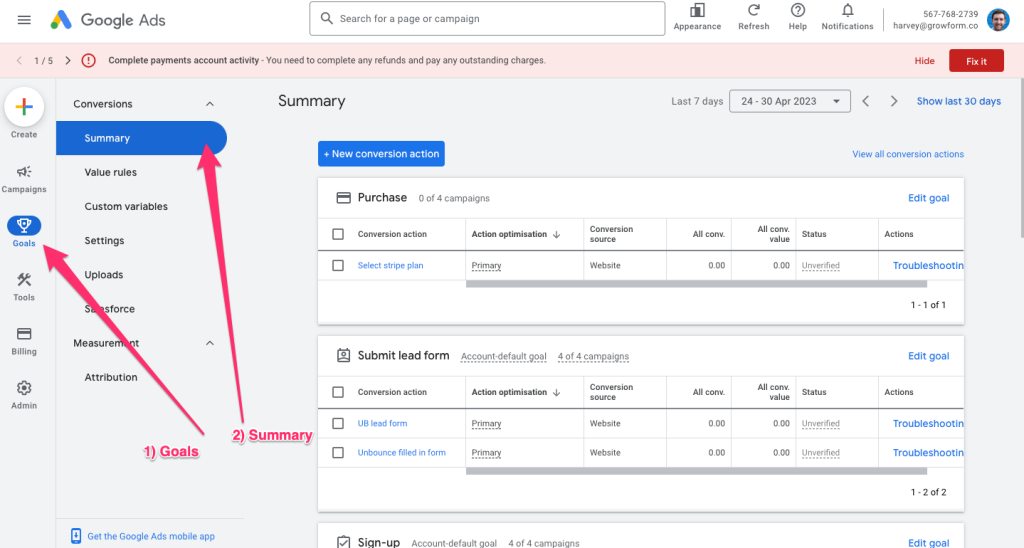
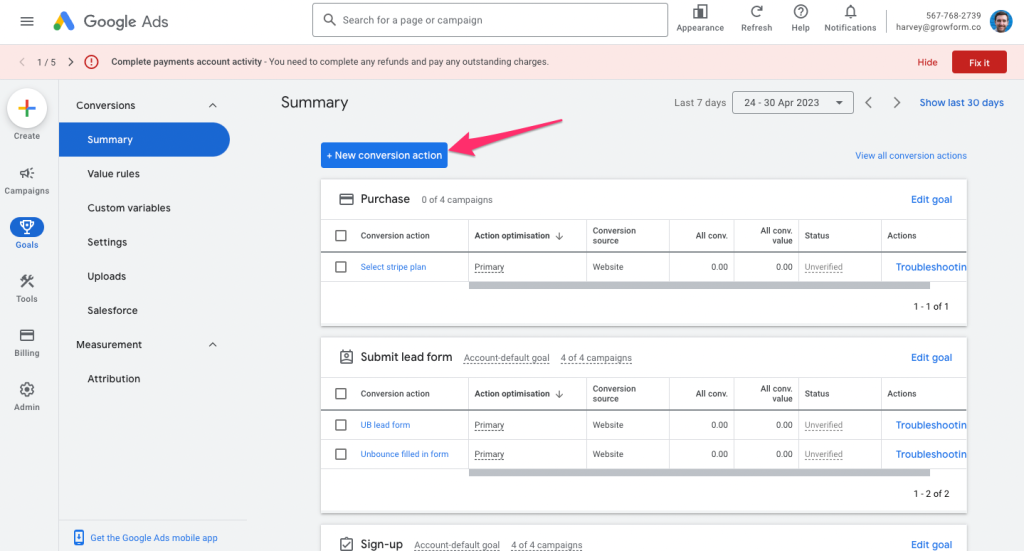
b) Add a new conversion: Click the blue “New conversion action” button to create a new conversion action, and then choose “Website”.
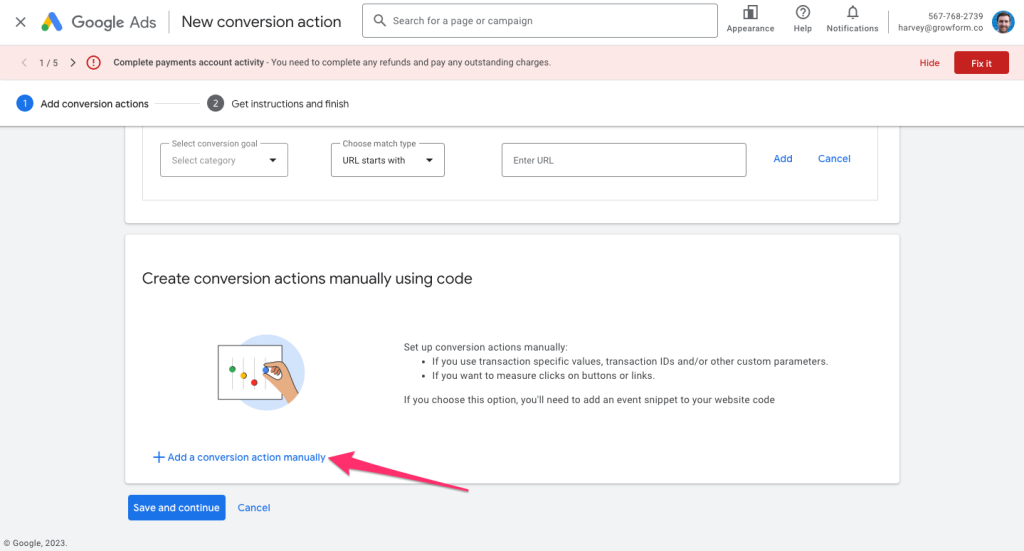
c) Enter your website: Enter your website URL and once you’ve completed the scan (which we won’t use here), hit “Add a conversion manually”:
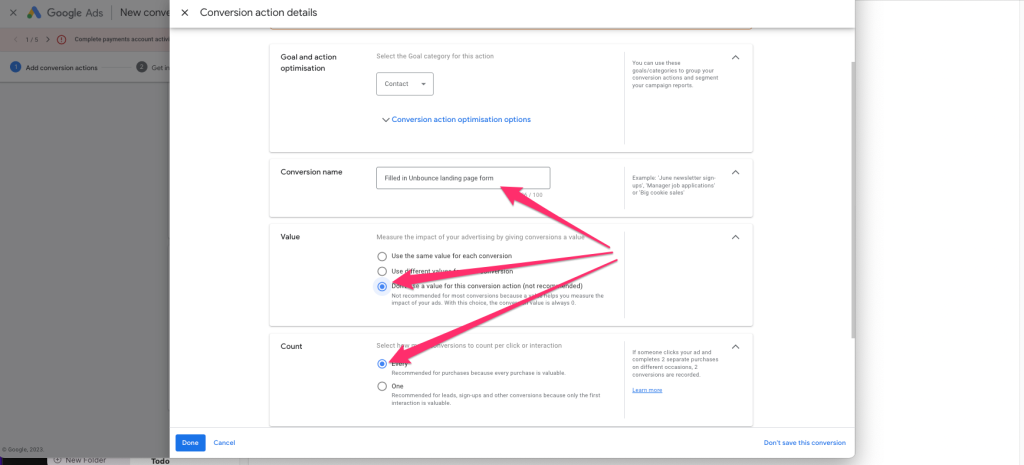
d) Choose your conversion details: For goal category, “Submit lead form” will suffice. For “Conversion name”, choose a meaningful name, like “Filled in Unbounce landing page form”. Choose a conversion value and count one conversion, not Google’s recommended “every” conversion. The other settings can remain the same:
e) Hit “Done”, and then “Save and continue”: It’s essential to hit “Save and continue” to get to the next step.
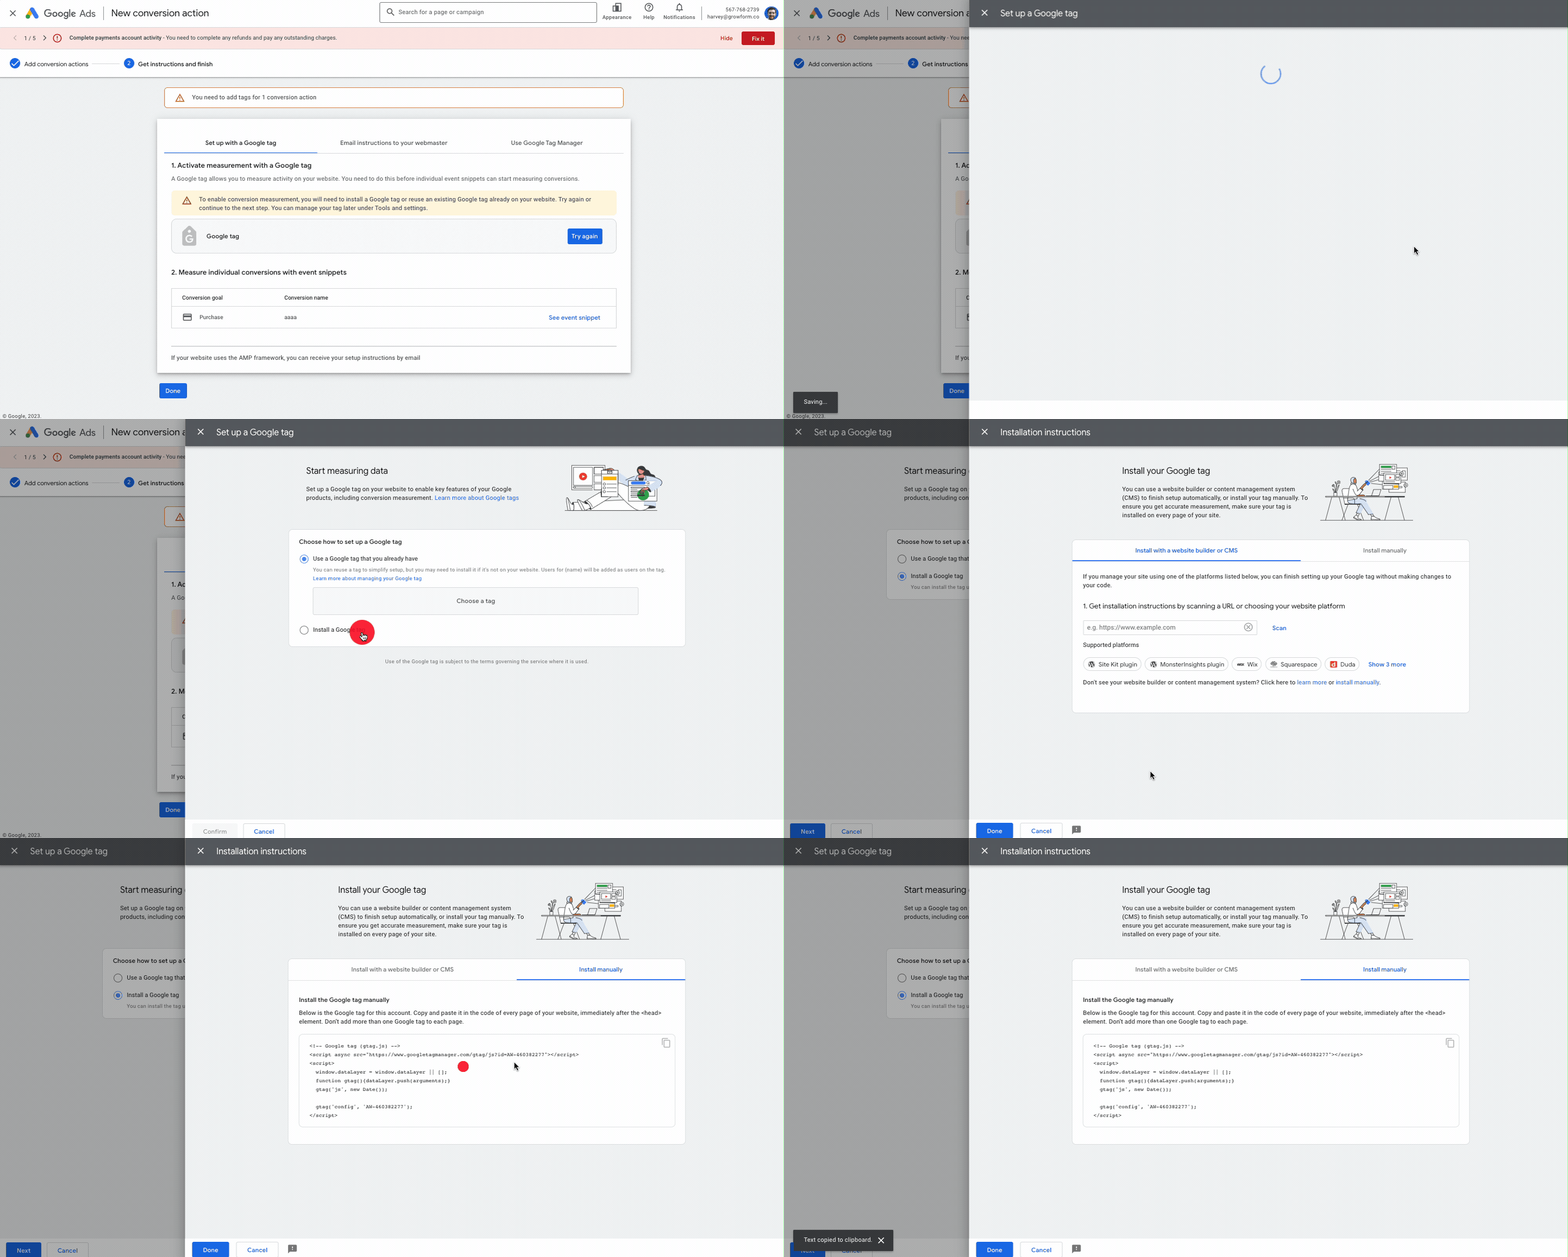
f) Grab your global tag (“Google Tag”): Under “Google Tag”, hit the blue “Set up” button. Choose “Install a Google Tag”, then hit “Next”. Hit “Install manually”. Copy the code to a notepad editor, and give it the title “Global tag” – you’ll need this later. Hit “Done” when you’ve finished with this step.
e) Grab your event snippet: Hit “See event snippet” next to the conversion goal you created earlier. Ensuring “Page load” is selected (because we’ll be firing this tag when a user opens our thank-you page), copy this script to your notepad editor with the title “EVENT SNIPPET”:
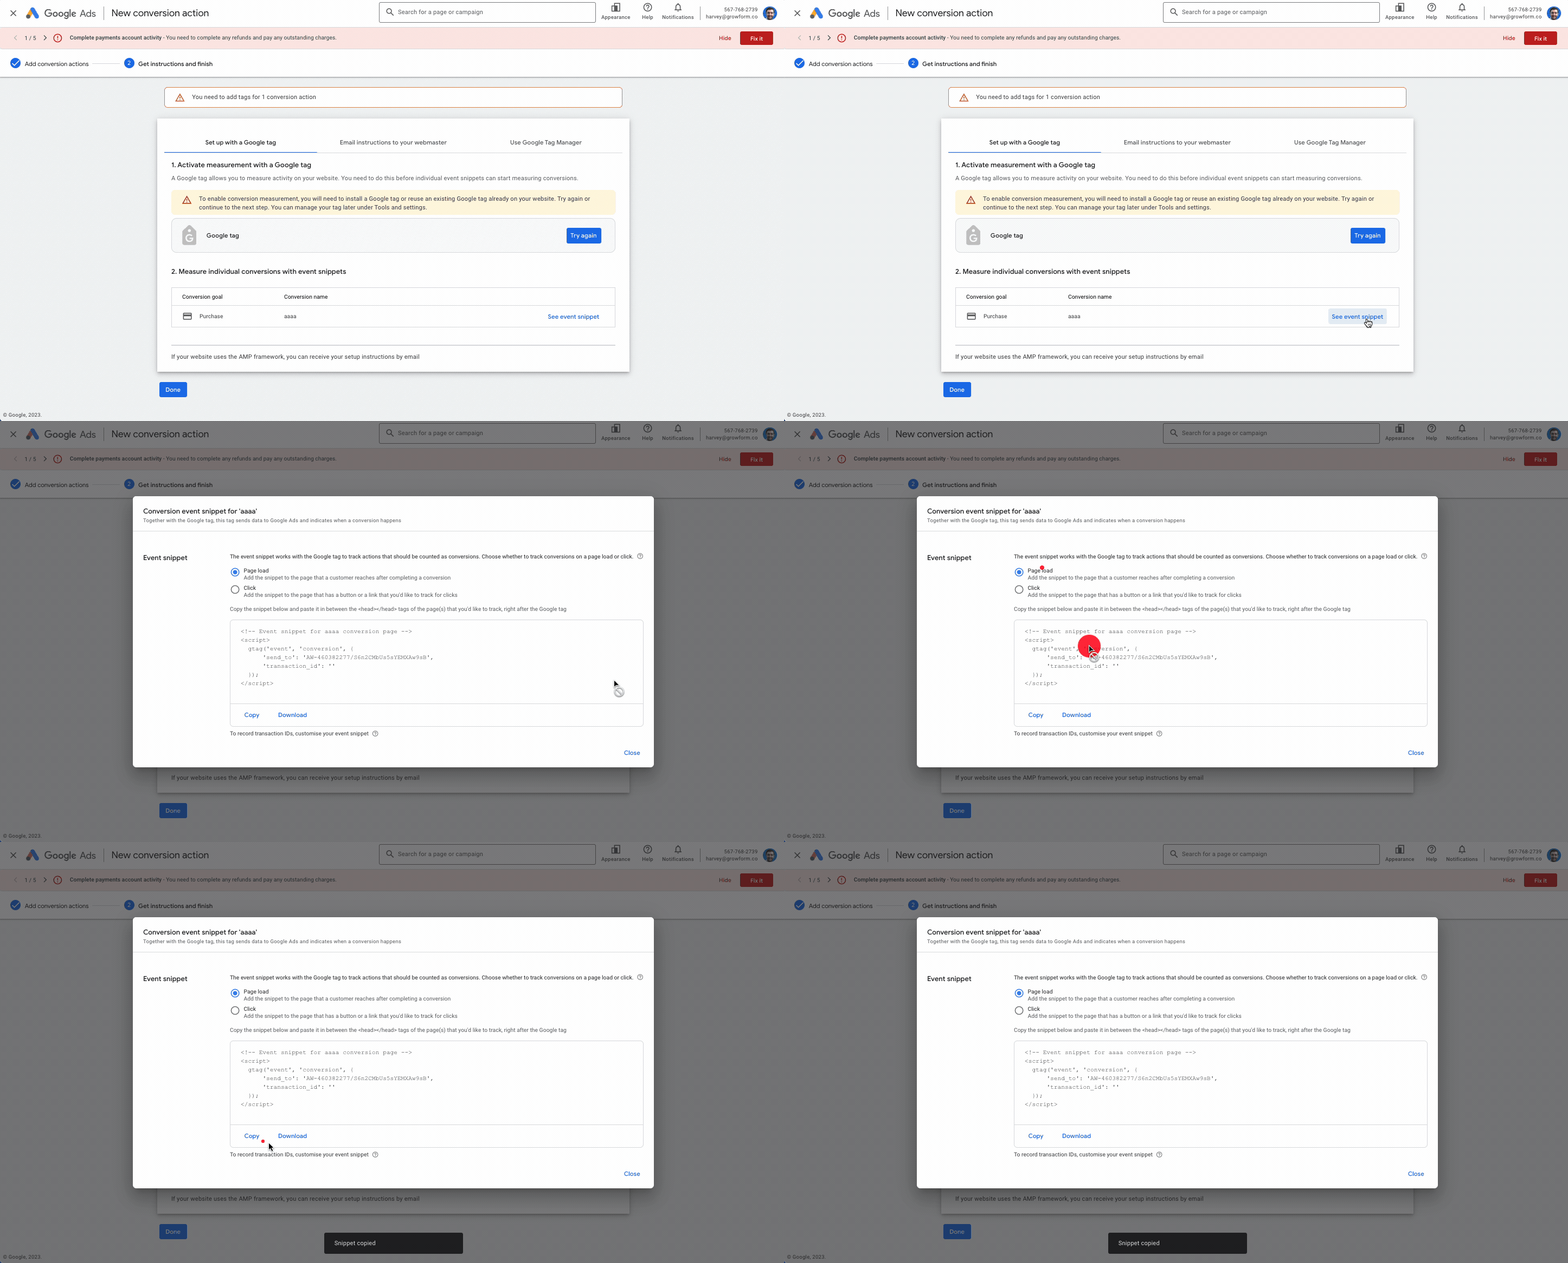
f) Save your changes: Hit “Close” to get out of the conversion event window, and then “Done” to exit the main conversion setup page in Google ads. You should see your conversion in the list.
That’s the hard bit done!
You should now have a notepad file (or multiple notepad files) with a “Global tag” and an “Event snippet” from Google.
As a recap, we’re going to fire the “global tag” on all pages, and the event snippet only on the “thank you” page that users see after filling in our form.
2) Add the global tag to all pages in Unbounce
The global tag lets Google link the visitor back to the Google ad campaign, and needs to appear on all pages the visitor sees to work properly.
Here’s how to add it to all pages on your Unbounce domain:
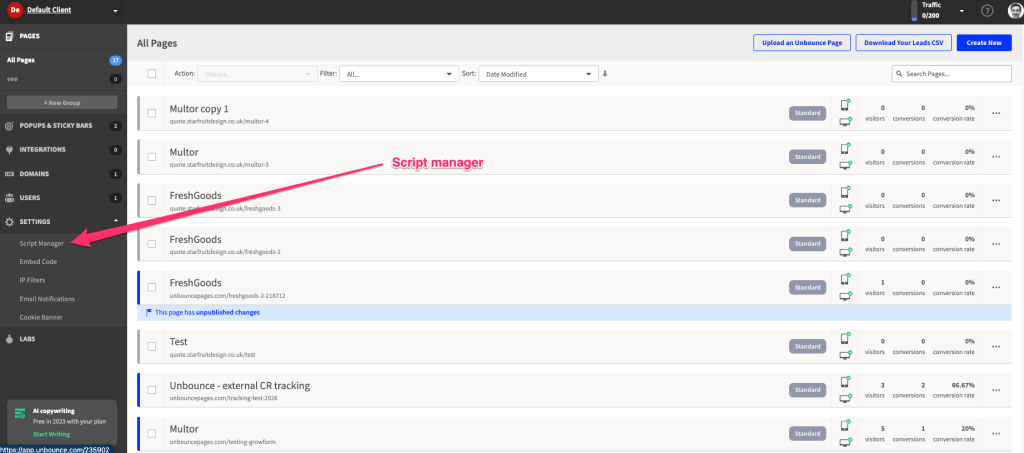
a) Login into Unbounce and edit domain settings: Log in to your Unbounce account and hit “Script manager” under settings on the left-hand side. Hit the blue “Add a script” button.
b) Enter your script details: Under “What would you like to add”, choose “Custom script”, and set your script name to “Google Ads – Global Tag” or similar, before hitting “Add script details”.

c) Choose script placement: For placement, choose “Head”. You must choose “All” under the “Included on” dropdown – NOT “Main landing page”:
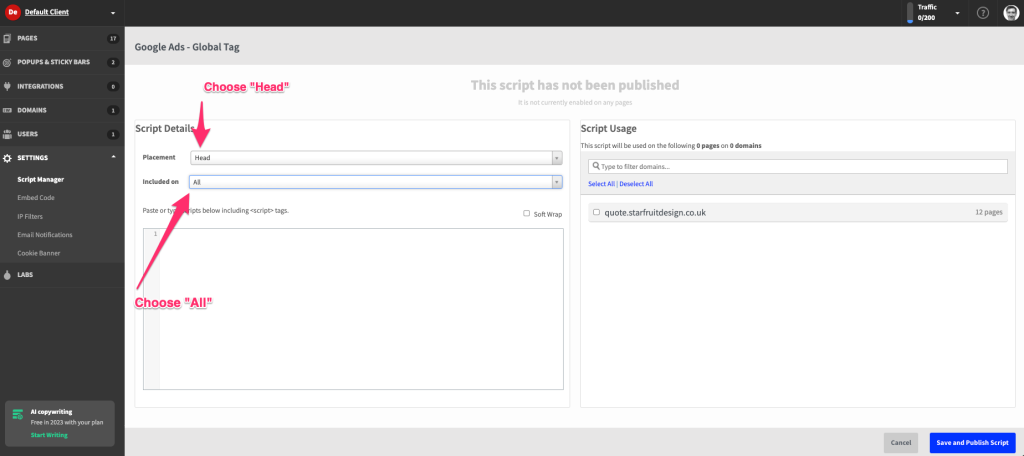
c) Paste the global tag code: In the “Script Content” box, paste the snippet code you saved earlier entitled “Global tag”.
d) Apply the script to pages: In the “Script usage” section, choose the domain you wish to add the script to, and hit “Save and publish script”:
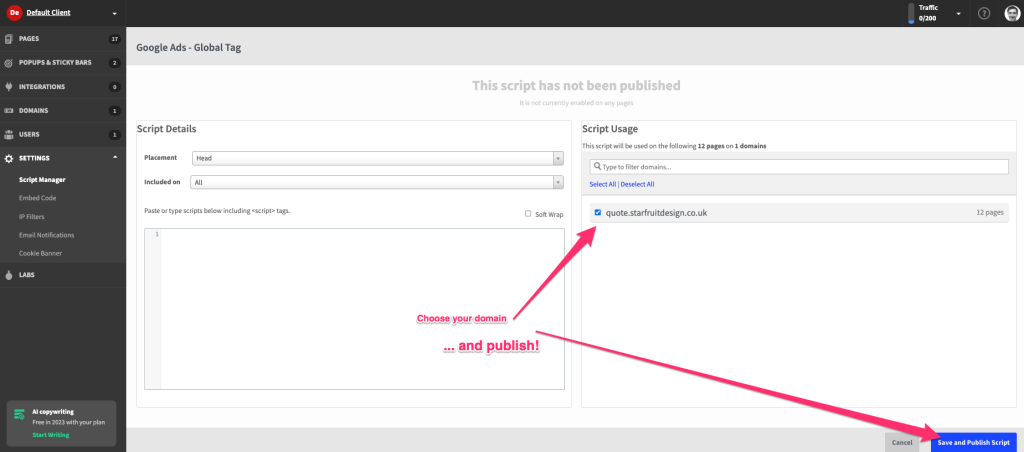
Success! You have now added the main Google Ads global script to pages across the domain; an essential part to getting Google Ads tracking up and running.
3) Add the event snippet (and global tag) to your thank you page
Although we’ve added the global tag to all pages on our Unbounce site, we now also need to add the event snippet to fire only on our thank-you pages, so Google tracks our conversion.
To ensure our global tag fires before the event snippet, we’ll also add the global tag in the same location – this is included in the guide below:
a) Edit your thank you page: Log in to your Unbounce account and locate the specific thank you page you want to edit, click that page and hit “edit” to open it in the Unbounce builder.
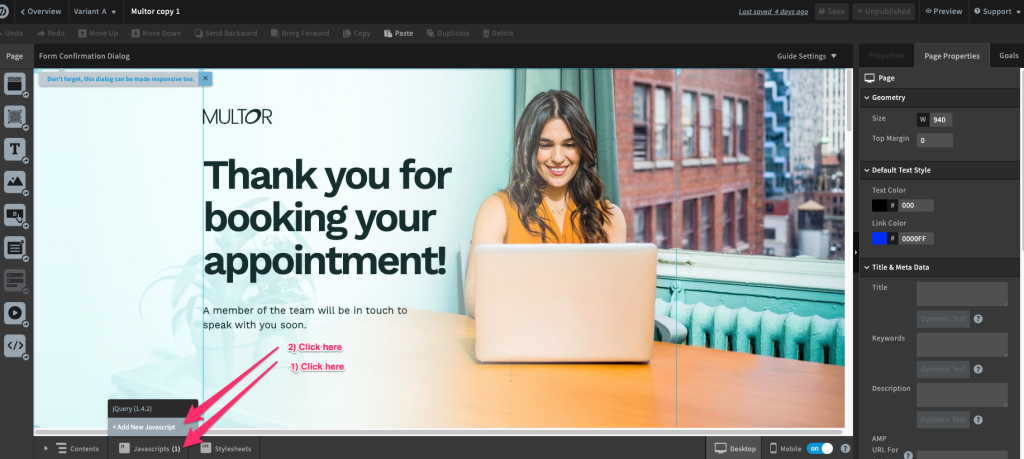
b) Navigate to “Javascripts”: Click the “Add New JavaScript” button to create a new JavaScript entry.
c) Set the placement to HEAD and choose a script name: Instead of “before body tag”, set this to “Head”. Set the script name to something like “Google Ads Event Snippet”:

d) Paste both snippets: Now, paste BOTH your global tag AND event snippet, with your global tag first. The whole tag should look like this:
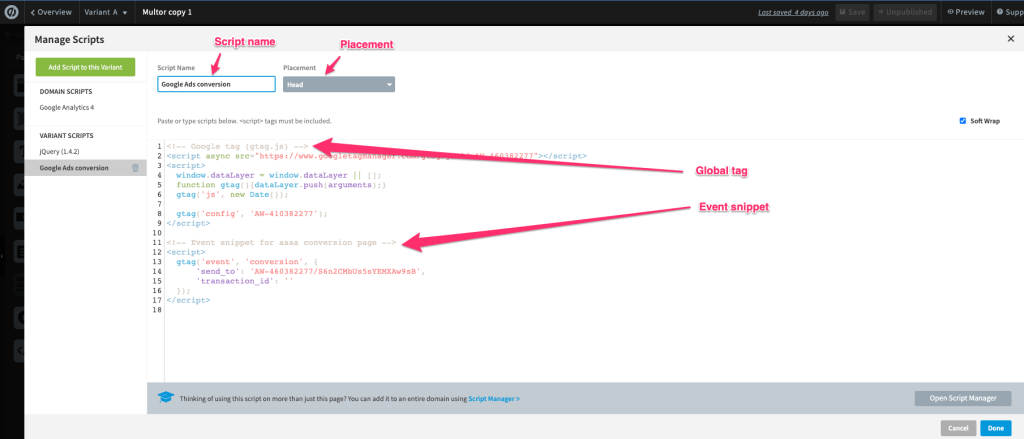
e) Save your changes: Hit “Done”, and don’t forget to save and publish your page.
In this step, we added both the global tag and the event snippet.
You may be wondering: didn’t we already add the global snippet to all pages?
Yes, we did – but due to the way Unbounce fires and prioritises tags, we need to fire it again above the event snippet. This won’t cause any problems with Google, and will ensure the event tag is fired properly.
4) Make sure your form redirects to your thank you page on submission
Finally, we need to make sure our form redirects to our thank you page once it’s submitted:
a) Access your Unbounce account: Log in to your Unbounce account and locate the specific landing page containing the form you want to edit.
b) Open the page in the Builder: Click on the name of the landing page, and select “Edit” to open it in the Unbounce Builder.
c) Select the form: Click on the form element within your landing page to access its settings.
d) Navigate to the Form Confirmation tab: In the right-hand side panel, click on the “Form Confirmation” tab to manage the form’s submission settings.
e) Choose a custom URL redirect: Select the “Redirect to URL” option to specify the thank you page URL where users will be redirected after submitting the form.
f) Enter the thank you page URL: In the “URL” field, type or paste the URL of the thank you page you want to redirect users to upon form submission.
g) Save your changes: Click “Save” in the top-right corner of the Builder to save the updates to your landing page, and re-publish the updated page.
Fine-tuning Unbounce Google Ads Conversion Tracking
Now that you’ve integrated Unbounce with Google Ads, you may wish to fine-tune the setup to get the most out of it.
Here’s how to configure Unbounce Google Ads conversion tracking:
- Choose your conversion window: The conversion window is the period during which a user’s interaction with your ad can be attributed to a conversion. In Google Ads, you can set your conversion window anywhere between 1 and 90 days. To configure your conversion window, navigate to the “Conversions” tab in Google Ads and click on the desired conversion action. From here, you can edit the conversion window settings.
- Select your attribution model: Attribution models determine how credit for a conversion is assigned to different touchpoints in the customer journey. Google Ads offers several attribution models, including last-click, first-click, linear, time-decay, and data-driven. To select your attribution model, navigate to the “Conversions” tab in Google Ads, click on the desired conversion action, and edit the attribution model settings.
- Enable auto-tagging: Auto-tagging is a feature in Google Ads that automatically adds tracking parameters to your ad URLs, making it easier to track conversions and gather insights about your campaigns. To enable auto-tagging, navigate to the “Account Settings” tab in Google Ads and toggle the “Auto-tagging” switch to “On.”
Troubleshooting Unbounce / Google Ads Conversion Tracking
Occasionally, you may encounter issues with your Unbounce Google Ads conversion tracking setup.
Here are some common mistakes to look out for:
- Global tag not included on every page: First, check the global site tag is installed on every page of the domain. If your visitor sees a page that doesn’t include the global tag, that’s the session lost. This tag should be firing in the HEAD section of the page, not “After body tag”.
- Event snippet not firing on thank you page: The event snippet tells Google that a conversion has taken place, so it’s essential to fire this on the thank-you page. Be sure to check you’re sending the correct conversion ID over to Google, too!
- Global tag not included before thank you page: Due to a quirk with the way Unbounce prioritise tag orders, you must insert the global tag just above the event tag when you include it on your thank you page – it’s not enough to rely on the “All pages” global tag. This is by far the most common problem we see.
- Wrong thank you page redirect: If you’ve tried all of the above, double check your form is sending visitors to the correct thank you page.
Remember, as with all online tracking, we don’t expect it to be perfect – we usually see 10-15% of conversions dropped, so simply alter our internal reports by the corresponding amount.
If you’re still having issues, we highly recommend the Google Tag Assistant plugin for Chrome, which will help highlight whether tags are firing.
Using Conversion Data to Optimize Your Campaigns
Once you’ve successfully set up Unbounce Google Ads conversion tracking, you can use the insights gleaned from your conversion data to optimize your campaigns for maximum performance. Here are some ways to utilize your conversion data to drive better results:
- Adjust bids and budgets: Use your conversion data to identify high-performing keywords, ad groups, and campaigns, and allocate more budget to these areas to drive better results.
- Refine targeting: Analyze your conversion data to understand your most valuable audience segments and refine your targeting accordingly.
- Optimize your landing pages: Use your conversion data to identify areas for improvement on your landing pages and make data-driven adjustments to improve performance.
Introducing an easier way to track conversions in Unbounce
Perhaps you’re wondering if there’s an easier way to fire pixels, capture leads and boost conversion rates.
Growform is the form builder specifically designed to elevate conversion rates and simplify lead generation:
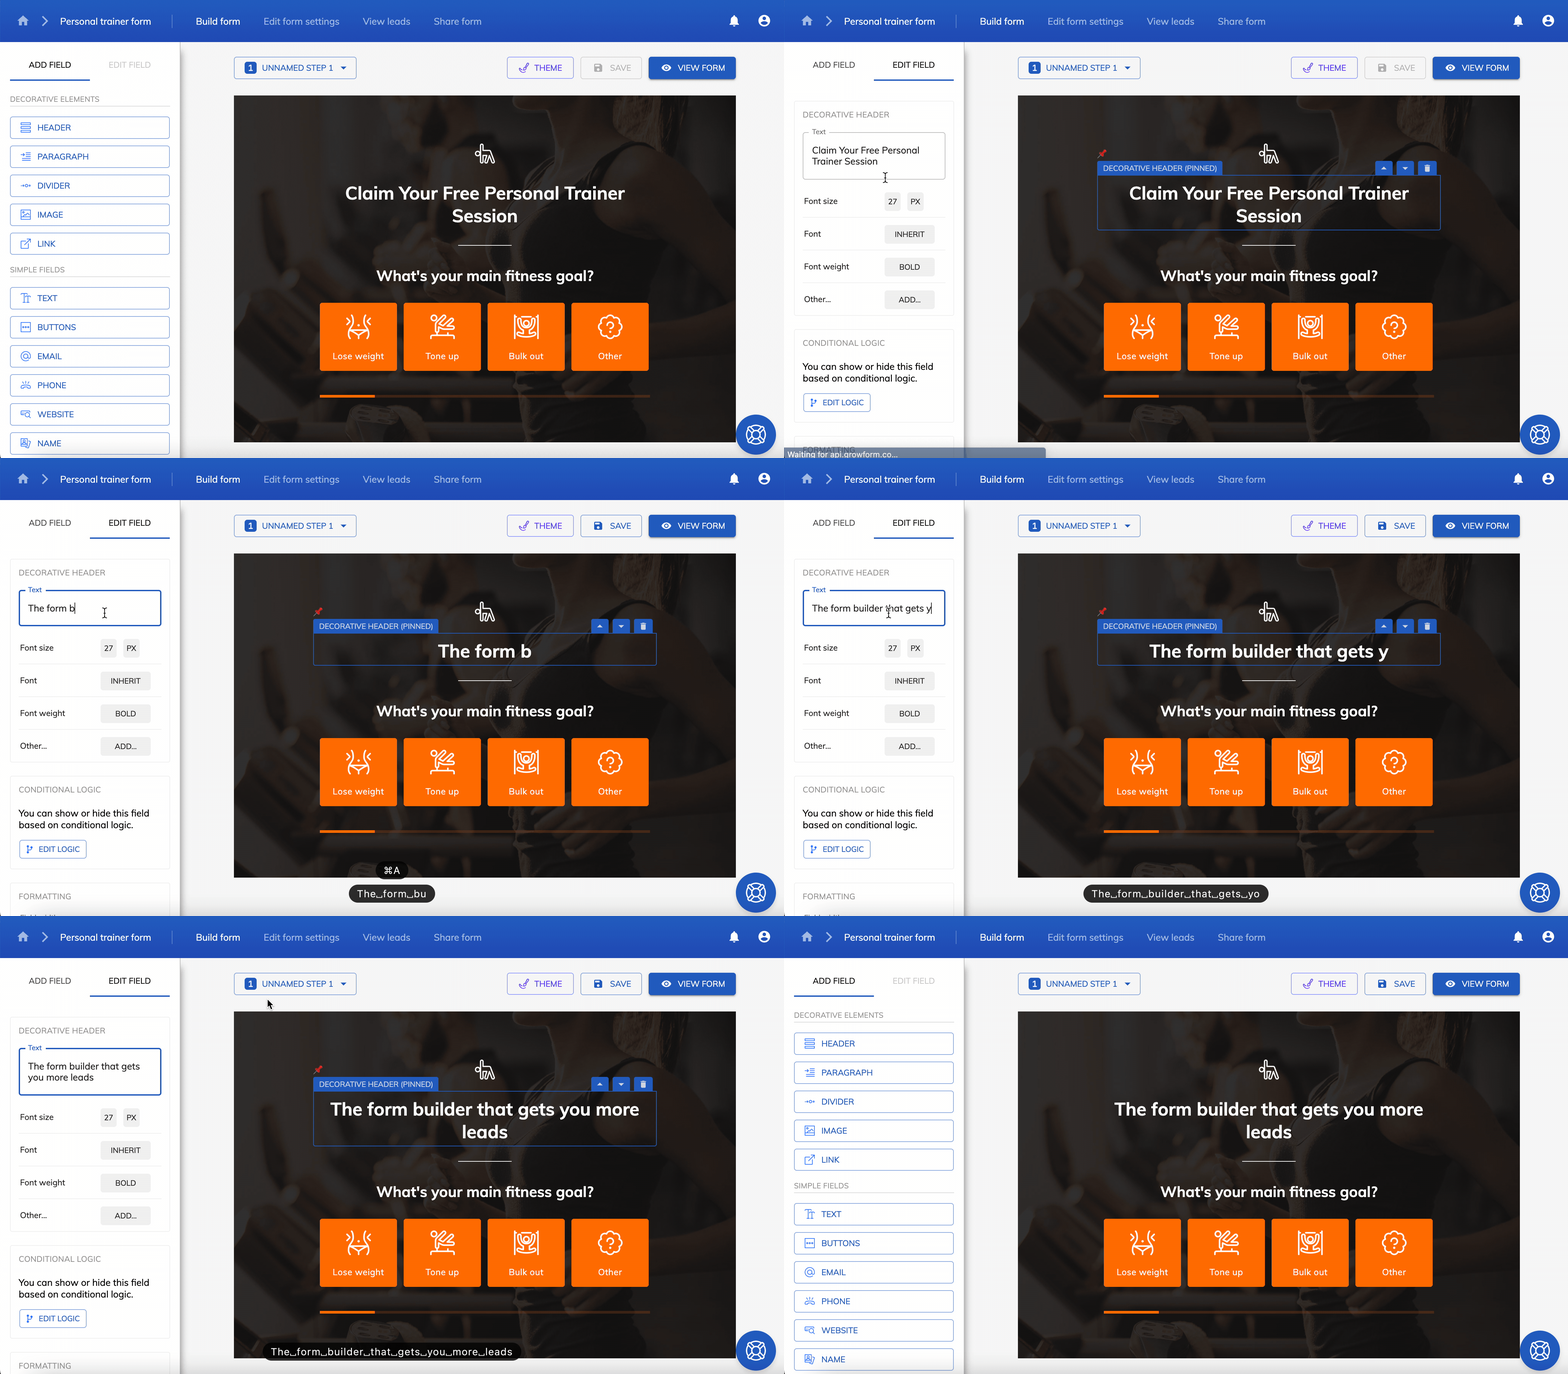
What sets Growform apart is its unique combination of conditional logic, 20+ best practices templates, and seamless integration with Zapier to send leads wherever they’re needed most.
You can even fire Google Ads, Facebook and Bing pixels with one click – and it fits perfectly into Unbounce.
There’s no credit card required – start your free 14 day free trial.
Recent Posts
- Your Guide to Using Webflow Form Builder Effectively
- Top 5 Lead Capture Form Examples That Can Boost Your Conversions (2025)
- What Is an Elementor Multi-Step Form & How Does Growform Improve It?
- We Review The Best Microsoft Forms Alternatives for Better Customization and Control
- Here’s Our Review of the Best Form Builders For WordPress Sites
