Growform API / How To Access Form Submission Data Programatically
Growform doesn’t yet have a public API, but it is possible to programatically access lead information on form submission.
For example, perhaps you wish to show a custom message on the screen or run advanced calculations that can’t be done on Growform.
There are 2 methods of accessing form data in the user’s browser:
1.) Use Google Tag Manager to access the “Form completed” event
2.) Pass form data in the query string to another page
We’ll look at each method in more detail below…
1.) Use Google Tag Manager to access the “Form completed” event
First, you’ll need to set up custom Google Tag Manager containers with Growform. There’s a full guide here (start from “1 – Create or log into your Google Tag Manager account”).
Once you have your containers set up, accessing the data is easy:
1.) Open your GTM parent container and create a new tag. Set the custom tag type as “Custom HTML”, and name it “Console log the fields object”.
2.) Under triggering, choose “Form completed”.
3.) Enter some custom code under “HTML”. In this example, we’ve done a simple console.log(). You can input two curly brackets to choose “Fields (populated on form submission)”.
4.) Hit “Save”, and be sure to publish your container.
Here’s what it should look like:

When you complete a form submission, you should now see the form submission object on your JavaScript console.
2.) Pass form data in the query string to another page
This method seems a little hacky, but can be quite seamless to the user if your code is fast. We’ll send the form information to another page you control and process it there.
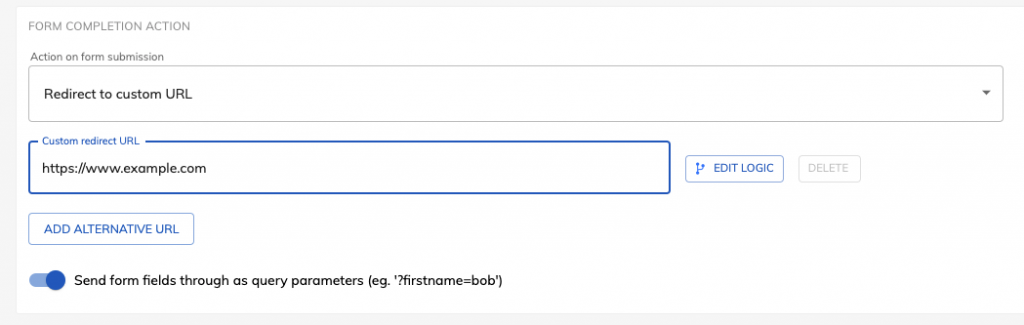
To achieve this, choose your form in Growform and hit “Edit form settings”.
Then, enter the URL where you’ll be hosting your custom script / thank you page and ensure “Send form fields through as query parameters” is checked before hitting “Save”:
Finally, on your externally hosted page, you can use JavaScript to get the parameters from the query string.