
HubSpot form tracking with Google Tag Manager (GA4 and Google Ads)
If you’ve arrived at this article, you’ve probably already tried to fire a Google Tag Manager (GTM) trigger on HubSpot form submission, but with no luck.

Updated Published 11 min read
If you have arrived at this article, you have probably already tried to fire a Google Tag Manager (GTM) trigger on a HubSpot form submission, with no luck.
Or perhaps you are wondering how to fire a tag at all when the form belongs to HubSpot.
HubSpot form tracking with Google Tag Manager means detecting the moment a HubSpot form is submitted and turning it into a GTM trigger, so that tags for Google Analytics 4, Google Ads or Meta fire on that submission rather than on a page view.
Here is the problem: the "standard" method of adding a GTM "Form Submission" trigger won't work, because HubSpot's form builder does not use the traditional form tags or events that GTM listens for.
Not to worry, though. There are two reliable ways to detect a HubSpot form submission and fire an event, and both are below. Either lets you fire tags from services like Google Analytics, Google Ads or Facebook when a visitor fills out your HubSpot form.
Update (October 2026): HubSpot's updated form editor announces a submission differently from the legacy editor. Legacy forms post a message called hsFormCallback, while forms built in the updated editor dispatch an event called hs-form-event:on-submission:success on the window. The listener in Method 2 now handles both. GA4 has also renamed conversions to key events, and Google's consent mode has carried two extra signals since November 2023. Every step was checked against HubSpot's and Google's documentation on October 9, 2026.
Why track conversions with HubSpot and Google Tag Manager?
We are probably preaching to the choir here, but tracking conversions is how you learn which channels produce leads and where the next dollar of budget should go. HubSpot records the submission in its own CRM. Your ad platforms only learn about it if something on the page tells them.
Running that tracking through Google Tag Manager has three benefits:
- Ease of use: Google Tag Manager gives you one place to add and change tags without a developer.
- Flexibility: One submission event can fire a GA4 key event, a Google Ads conversion and a Meta Pixel event at the same time.
- Accuracy: When HubSpot or an ad platform changes its tag, you update the container, not the website.
Method 1: redirect the HubSpot form to a custom thank-you page
This method is beautiful in its simplicity: you configure HubSpot to redirect visitors to a particular thank-you page after they submit your form.
Then, you use Google Tag Manager to watch for visits to the thank-you page and fire your conversion tags when it loads.
The main advantage is that it requires no custom code. It is a solid, reliable and maintainable way to fire GTM tags when a form submission is received.
The main disadvantage is that your visitors have to leave the page. If you want them to stay put and see a thank-you message instead, Method 2 is the better option.
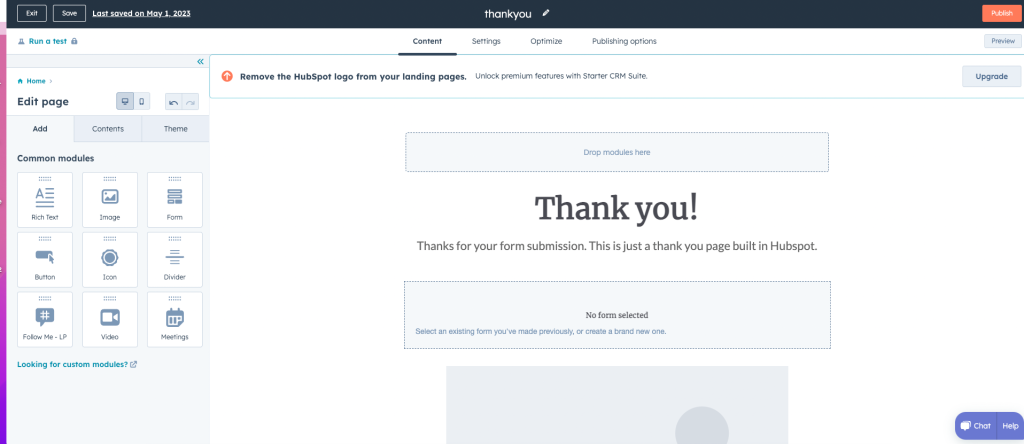
To set up conversion tracking using this method, follow these steps:
- Create a custom thank-you page: Design a page on your website that visitors land on after submitting the form. Thank them, and give them any next steps. You can build the page in HubSpot's landing page tool, too.
- Set up the redirect in HubSpot: Where this lives depends on which editor built the form. In the legacy form editor, open the form, select the "Options" tab and, under what should happen after someone submits the form, choose the redirect to a HubSpot page or an external URL. In the updated form editor, open the contents panel in the top left, select the "On submit" step, open its "Options" tab and choose the redirect option, which accepts a HubSpot page, a URL, a meeting link or a payment link. HubSpot's guide to creating and editing forms walks through the updated editor.
- Create a new trigger in Google Tag Manager: In GTM, go to "Triggers" and hit "New". Open the trigger configuration and choose the page view trigger. Set it to fire on some page views, and use the condition to match your thank-you page, for example Page URL contains /thankyou.
- Apply the trigger to your tag: Still in GTM, create a new tag if you have not already. In the tag's settings, add a trigger and choose the one you created in step 3.
One catch applies when the form sits on a HubSpot-hosted page. HubSpot's own pages show an inline thank-you message by default and ignore the redirect set in the form editor, so set the redirect in the page editor's form module as well. HubSpot's legacy page forms article describes the override.
These instructions assume you already have Google Tag Manager installed on your HubSpot pages.
Do not forget to save and submit your changes to GTM.
You are now firing tags when a visitor reaches your thank-you page, and by extension, whenever somebody fills in your form.
Method 2: listen for HubSpot's form submission event
Although HubSpot does not use old-fashioned form handlers, which makes firing conversions a little fiddly, it does announce a submission to the page. The announcement differs by form editor:
- Legacy forms post a browser message with the type hsFormCallback and the event name onFormSubmitted, with the form ID in the message. HubSpot documents it in its legacy forms reference.
- Forms from the updated editor dispatch a window event called hs-form-event:on-submission:success, and the event gives you the form instance and its ID. HubSpot documents it in its global form events guide.
We are going to add a small script to GTM that listens for both, and pushes one event of our own into the data layer, where GTM can use it.
This method removes the need for a thank-you page and fires the instant the submission is saved.
To set up conversion tracking using this method, follow these steps:
1) In GTM: create a data layer variable for the HubSpot form ID
First, create a data layer variable in GTM. This lets us use the form ID once HubSpot has given it to us:
- In your Google Tag Manager account, navigate to "Variables" and click "New" under the user-defined variables.
- Name your variable something descriptive, like "HubSpot Form ID".
- In the variable configuration, choose the data layer variable type.
- For the data layer variable name, enter hubspotFormId.
- Save your variable.
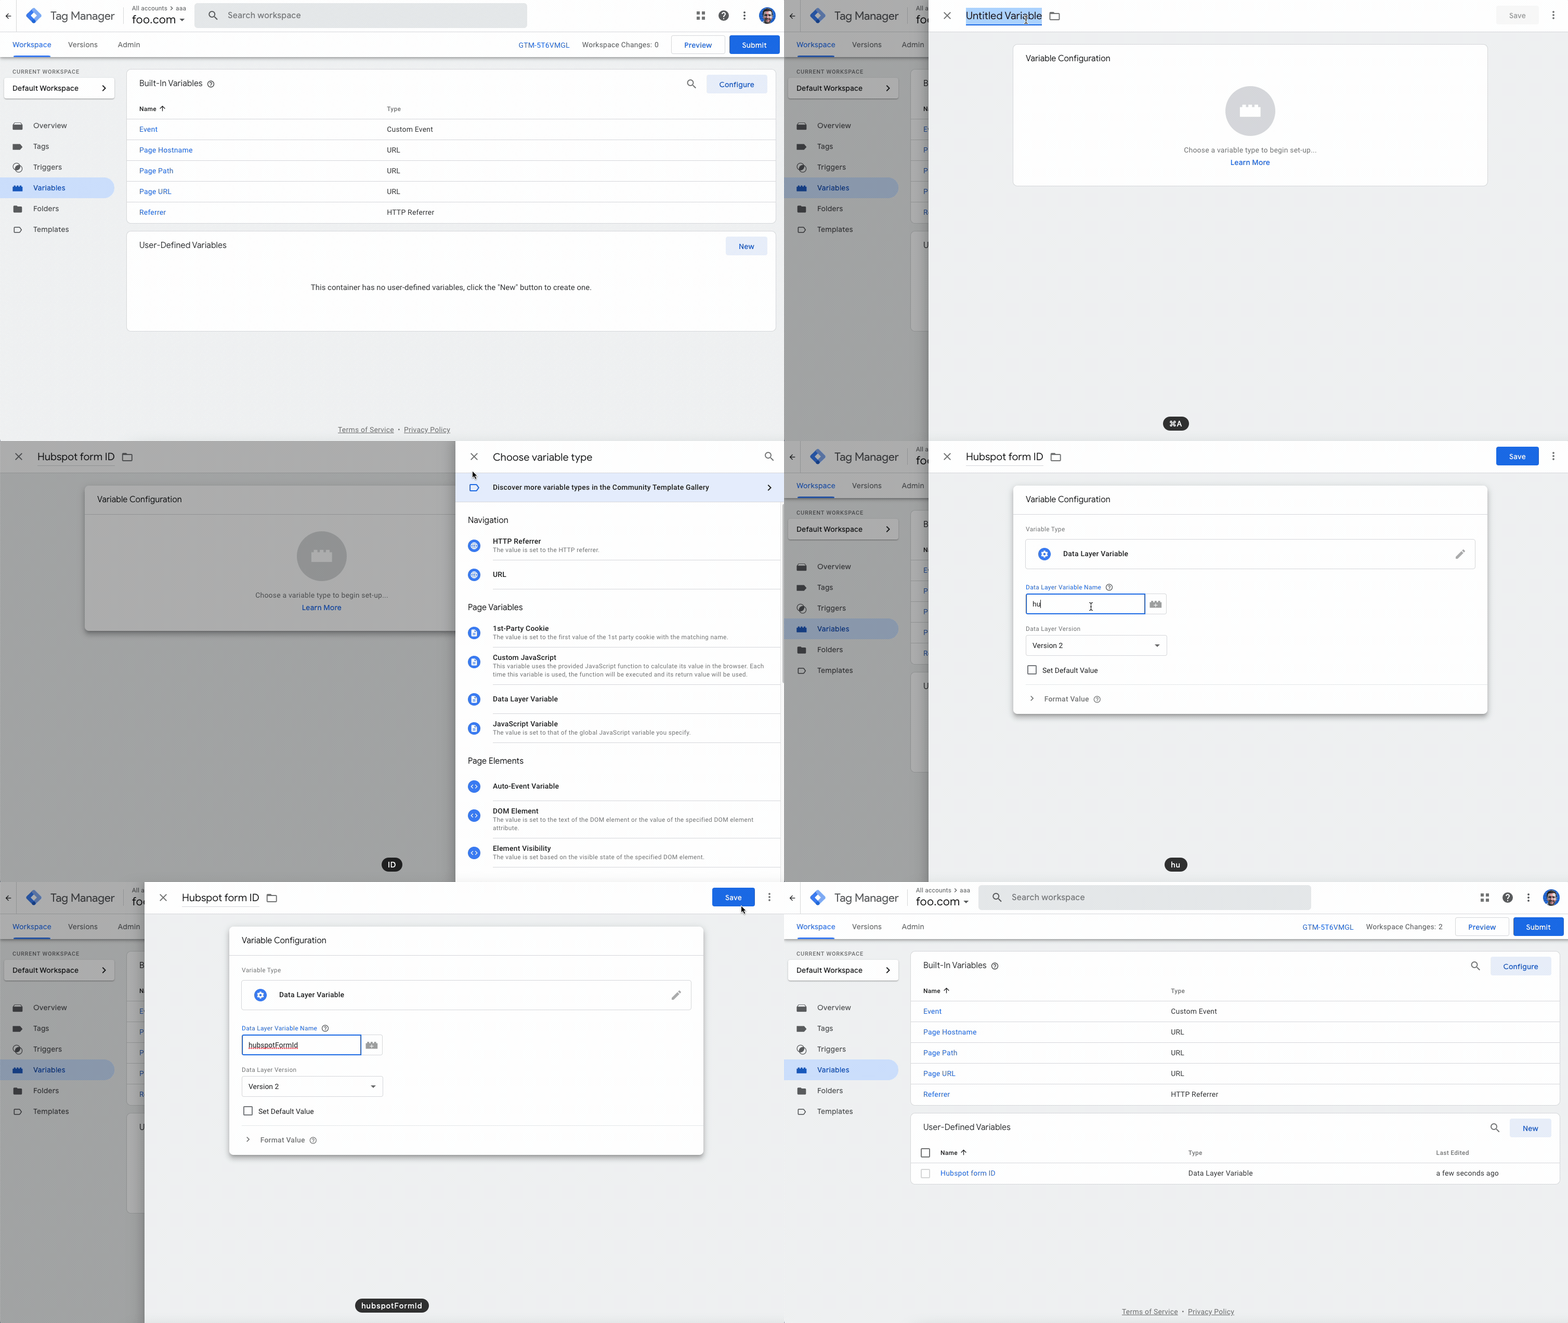
GTM can now read the HubSpot form ID from the data layer once our script has pushed it there.
2) In GTM: create a custom HTML tag to listen for the HubSpot event
Next, create a tag that listens for HubSpot's submission event. It needs to run on every page that contains a HubSpot form.
Here is how:
- Go to "Tags" in GTM and click "New".
- Name your tag something descriptive, like "Listen for HubSpot Form Submit".
- Choose "Custom HTML" as the tag type.
- Add the following code in the HTML field:
<script type="text/javascript">
  function pushHubSpotSubmit(formId) {
    window.dataLayer = window.dataLayer || [];
    window.dataLayer.push({
      'event': 'hubspotFormSubmit',
      'hubspotFormId': formId
    });
  }

  // Legacy forms editor: HubSpot posts a message to the page
  window.addEventListener('message', function (event) {
    if (event.data && event.data.type === 'hsFormCallback' && event.data.eventName === 'onFormSubmitted') {
      pushHubSpotSubmit(event.data.id);
    }
  });

  // Updated forms editor: HubSpot dispatches an event on the window
  window.addEventListener('hs-form-event:on-submission:success', function (event) {
    var form = window.HubSpotFormsV4 && window.HubSpotFormsV4.getFormFromEvent(event);
    pushHubSpotSubmit(form ? form.getFormId() : (event.detail && event.detail.formId));
  });
</script>- Under "Triggering", choose for this tag to fire on "All Pages", or on the specific pages where your HubSpot form is present. It must load before the visitor submits, so an all-pages trigger is the safe choice.
- Save your tag.
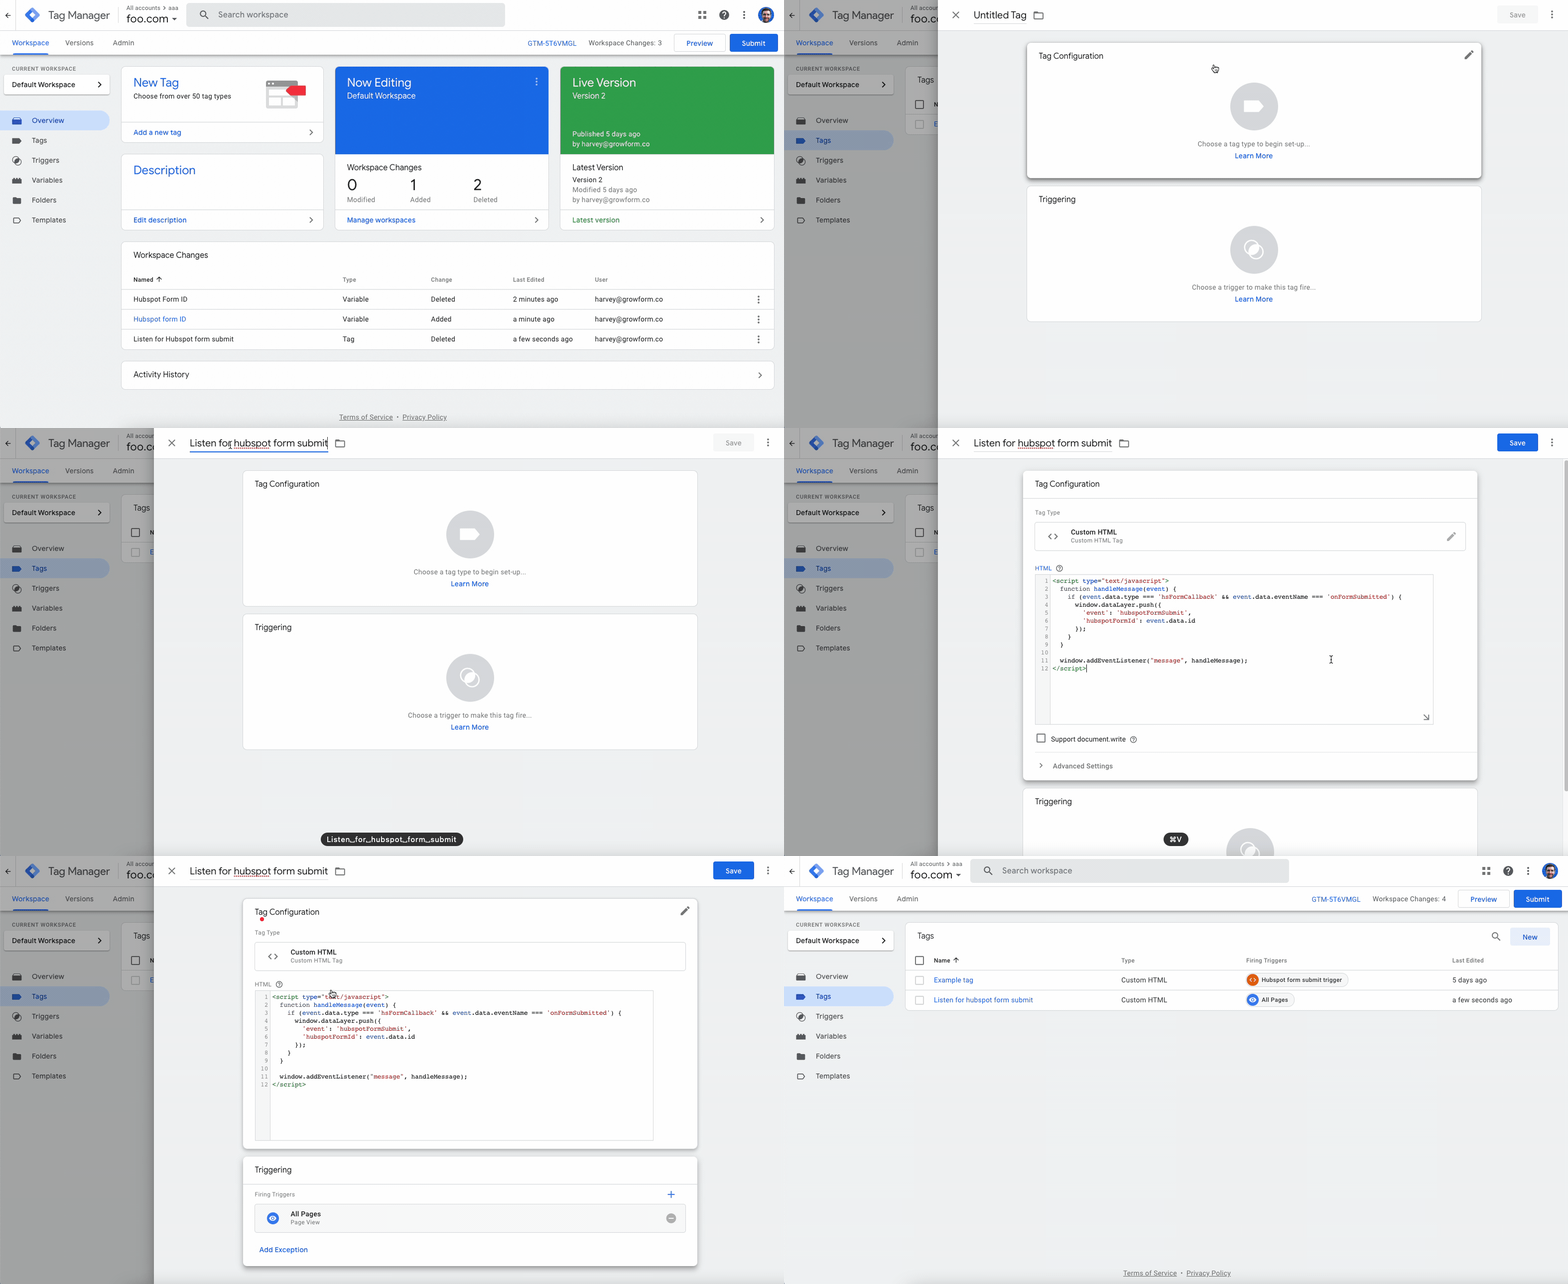
It looks a little complicated, but the code does one thing: whichever HubSpot event arrives, it pushes an event called hubspotFormSubmit into the GTM data layer, with the form ID attached, so we can build a trigger on it. If every form on your site comes from one editor, you can delete the other listener, but leaving both does no harm.
3) In GTM: create a custom event trigger to listen for the event
Now, create a trigger that fires when GTM's data layer receives the event we pushed in step 2:
- Go to "Triggers" in GTM and click "New".
- Name your trigger something like "HubSpot Form Submit Trigger".
- Choose "Custom Event" as the trigger type.
- In the event name field, enter hubspotFormSubmit.
- Leave the trigger set to fire on all custom events.
- Save your trigger.
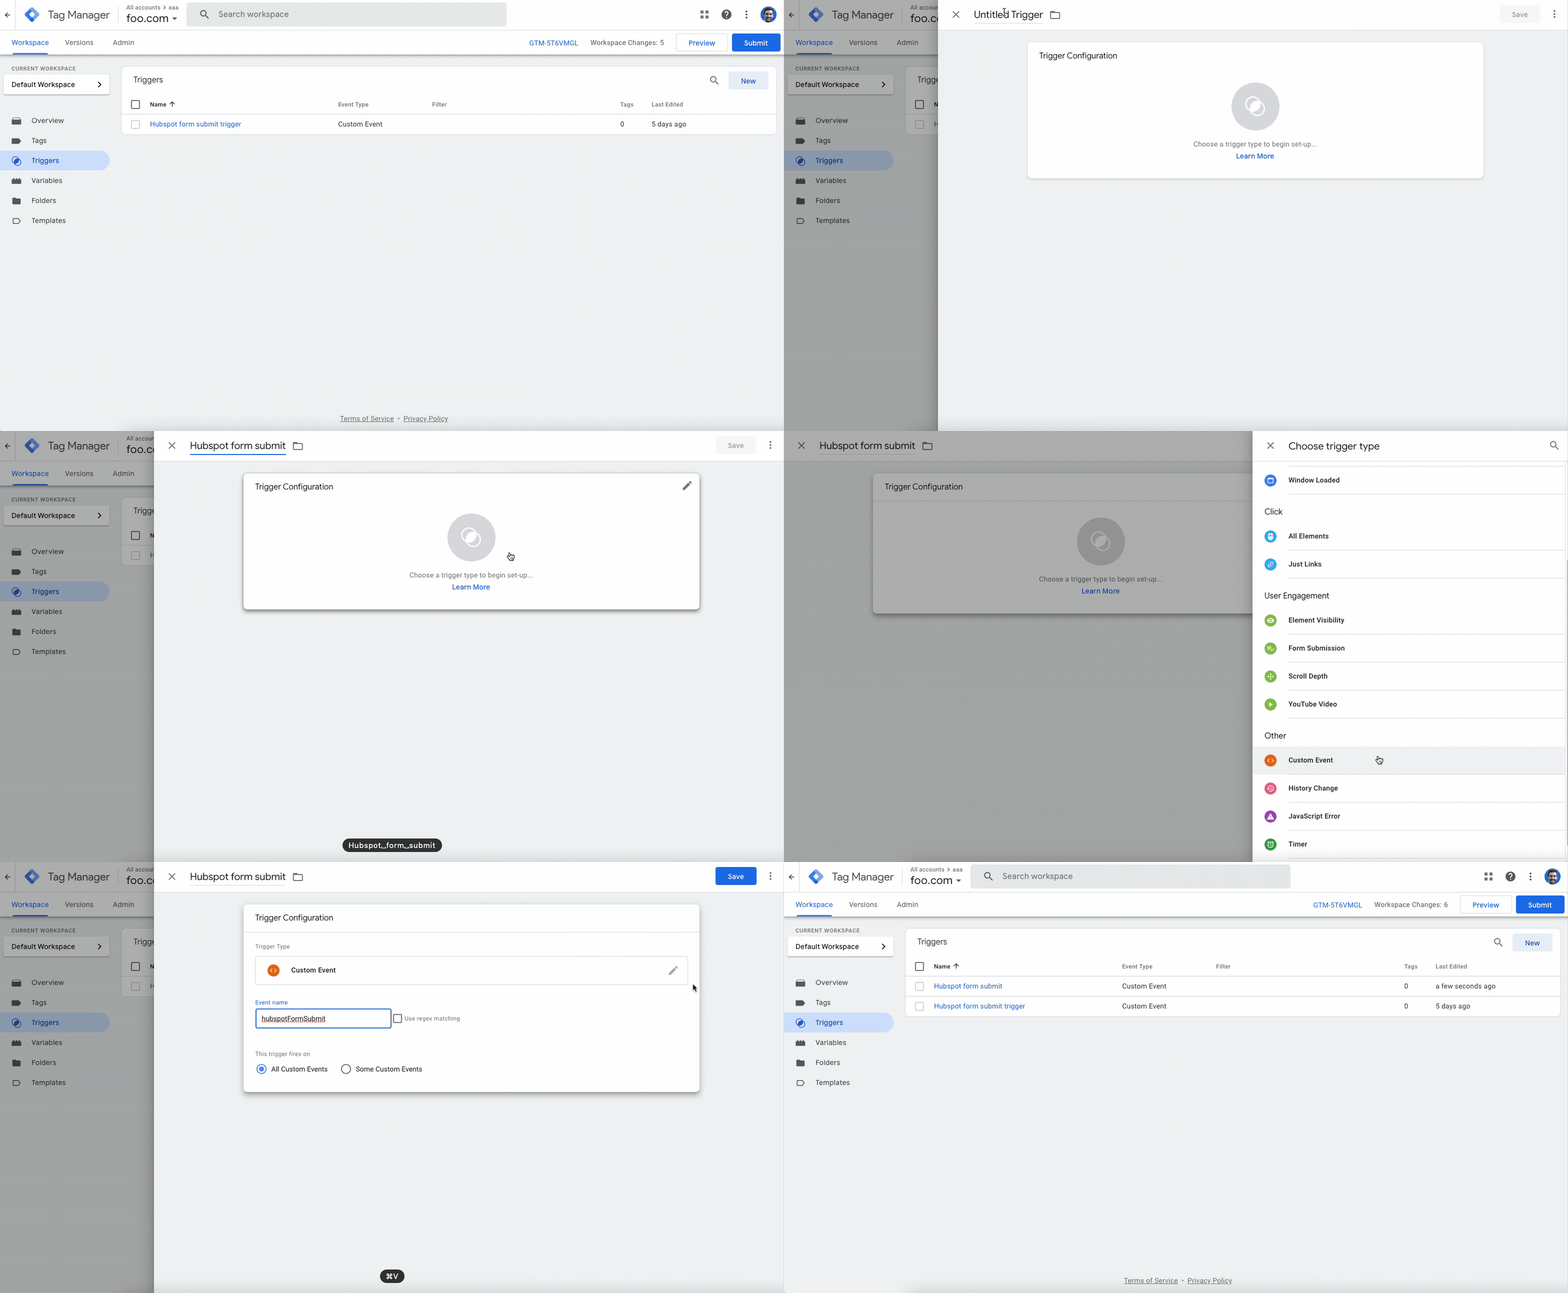
This trigger listens for the hubspotFormSubmit event in the data layer.
Advanced tip: if you have multiple forms, set the trigger to fire on some custom events instead, and add a condition that the HubSpot Form ID variable equals the form you care about. You can then have a different trigger for each form.
4) In GTM: configure your tag to fire when your trigger fires
Now we have our trigger set up, all that is left is to fire a tag from it:
- Create a new tag or edit an existing conversion tracking tag in GTM.
- Choose the appropriate tag type and configure the tag settings as required.
- In the "Triggering" section, click the "+" button to add a trigger.
- Select the "HubSpot Form Submit Trigger" you created in step 3.
- Save your tag.
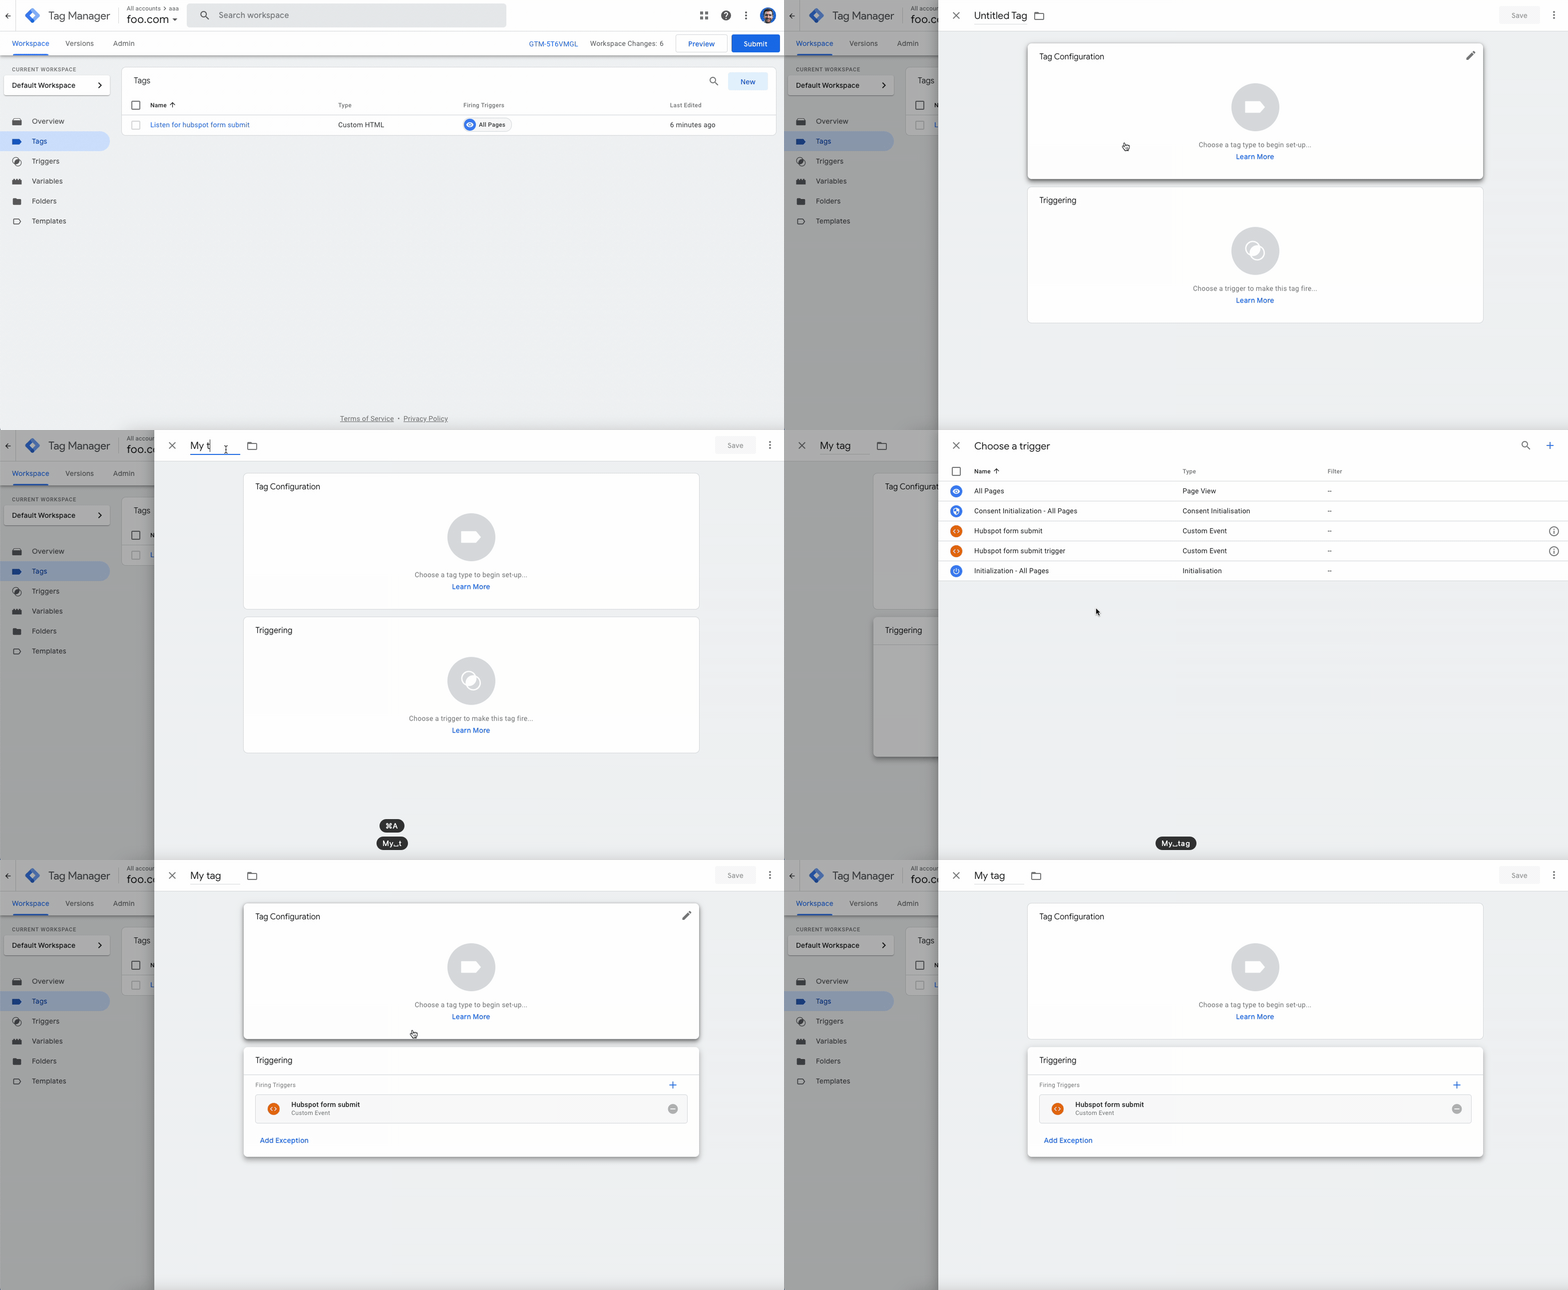
You can also use the HubSpot Form ID variable like any other variable, which is particularly useful when sending data back to analytics tools.
Sending the submission to GA4 and Google Ads
For Google Analytics 4, the tag in step 4 is a GA4 event tag. Google's recommended events include generate_lead for a submitted form, and using that name populates GA4's lead acquisition report. Set the event name to generate_lead and add an event parameter called form_id with the value of your HubSpot Form ID variable, so each form can be told apart in reports.
To count it as a conversion, GA4 now asks you to mark the event as a key event: in Admin, under Data display, open Events, create an event named generate_lead if it has not arrived yet, and turn on the key event toggle. A standard property can hold 30 key events. Key events shared with Google Ads become Google Ads conversions.
For Google Ads, the tag is a Google Ads conversion tracking tag with your conversion ID and label, fired by the same trigger.
One more thing to check is consent. Google's consent mode was updated in November 2023 with two more signals, ad_user_data and ad_personalization, alongside analytics_storage and ad_storage. If your consent banner sets them, Google's tags adjust what they send once the visitor has chosen, so a submission from a visitor who declined advertising cookies may be modeled rather than counted directly. That is working as intended, not a bug in your trigger.
Testing and verifying conversion tracking
Before you can trust the data from your conversion tracking setup, test that everything is working. To do this, follow these steps:
- Preview your Google Tag Manager container: In GTM, click "Preview" to open Tag Assistant and connect it to your site. You can watch which tags fire on each page in real time.
- Submit a test form: Visit your website and submit the HubSpot form you set up. If everything is wired up, the hubspotFormSubmit event appears in the Tag Assistant event list and your conversion tag shows as fired on it.
- Verify conversions in your platform of choice: Check GA4's realtime report or your Google Ads conversions page to confirm the test conversion is recorded. Google Ads can take a few hours, so be patient.
Troubleshooting common issues with HubSpot and Google Tag Manager
If you run into issues while setting up conversion tracking with HubSpot and Google Tag Manager, consider the following:
- Incorrect data layer variable name:
- Ensure the variable name is hubspotFormId, with that exact capitalization.
- Custom HTML tag not firing:
- Check the tag is added to the pages that contain the HubSpot form, and that it fires before the visitor can submit.
- Custom event trigger not detecting the event:
- Verify the event name in the trigger is hubspotFormSubmit.
- Check which editor built the form. A form from the updated editor never sends hsFormCallback, and a legacy form never sends hs-form-event:on-submission:success. The script above listens for both.
- Redirect ignored on a HubSpot page:
- Set the thank-you action in the page editor's form module as well as in the form itself. The page setting wins.
- Conversion tracking tag not firing:
- Ensure the "HubSpot Form Submit Trigger" is attached to the conversion tracking tag, and that your consent banner is not keeping the tag paused for that visitor.
- GTM container not published or outdated:
- Publish the latest version of your GTM container after making all the changes.
Introducing a better form builder
If you have ever wanted to improve your conversion rates and capture more leads, you may be interested to hear about Growform.
Growform is a form builder built from the ground up to deliver more leads from the same traffic, by applying conversion rate optimization (CRO) principles to every form:

It lets you build multi-step forms that look right on any device and send every lead to HubSpot through the native HubSpot integration, or to 7,000+ other apps through Zapier. Tracking is built in: Growform sends growformStepCompleted and growformFormCompleted events to GA4, and reports steps, button clicks and qualified completions to Google Tag Manager containers you own, so there is no listener script to maintain.
Every plan starts with a 14-day free trial. Start free trial.
Frequently asked questions
Why doesn't GTM's form submission trigger work with HubSpot forms?
GTM's built-in Form Submission trigger listens for the browser's standard submit event on a form element. HubSpot forms are rendered and submitted by HubSpot's own script, so that event never reaches GTM. You need either a thank-you page the visitor lands on, or a listener for the event HubSpot sends when the submission is saved.
How do I track HubSpot form submissions in GA4?
Push HubSpot's submission event into the GTM data layer with the script in this guide, build a custom event trigger on it, and fire a GA4 event tag named generate_lead. Then mark generate_lead as a key event in GA4's Admin area so it counts as a conversion.
What is hsFormCallback?
hsFormCallback is the type of the browser message that HubSpot's legacy embedded forms post to the page at each stage of their life, such as onFormReady and onFormSubmitted. The message carries the form ID, and for onFormSubmitted it also carries the submitted values and any redirect URL.
Does the hsFormCallback method work with HubSpot's updated form editor?
No. Forms built in the updated editor dispatch a window event called hs-form-event:on-submission:success instead, and expose the form through HubSpotFormsV4.getFormFromEvent. The script in Method 2 listens for both, so one GTM setup covers forms from either editor.
Related articles

7 Form Builders With Hidden Fields for Attribution
September 30, 2026

Zapier Webhook to Google Sheet How to Connect Fast
You've paid for the click, a prospect has completed a multi-step form, and the sales team is waiting for the lead.
September 30, 2026

8 API Integration Examples for Lead Capture
A lead stack can lose more value after the form is completed than before it.
September 30, 2026