
7 Best Asana Form Integrations for Faster Handoffs

If you use forms to collect requests, leads, or internal intake, Asana can be a very effective handoff destination because it turns submissions into work items fast. Growform is a no-code multi-step lead form builder, and it is relevant here because many teams use a specialized front-end form tool while Asana handles task assignment, project visibility, and downstream follow-up.
Table of Contents
TL;DR: Summary
- The best Asana form integration setup for faster handoffs is usually Asana forms for simple internal intake, or a third-party form plus Zapier when you need stronger qualification, better mobile conversion, or richer data mapping.
- Asana forms create a new task in the project where the form lives, and section mapping controls where that task lands.
- Zapier extends Asana into a practical intake hub by creating tasks or projects, updating tasks, and connecting Asana to thousands of other apps.
- Growform is relevant when the form side needs multi-step qualification, and its Asana workflow runs through Zapier with actions including Create Task, Create Subtask, Create Project, Add Task to Section of Project, and Update Task.
- If you only need an internal request form, native Asana is often enough. If you need attribution fields, validation, or lead qualification before handoff, an external form tool is usually the better fit.
- For paid traffic at volume, test field mapping, section routing, assignees, and rule triggers before launch, because a task that gets created in the wrong section is still a broken handoff.
The practical decision is less about “Can Asana take form submissions?” and more about “Where should qualification happen?” Asana’s own documentation and Zapier’s app workflows point to a strong pattern: capture clean inputs, create a task immediately, route it to the right section, then let rules and custom fields handle the next step.
How does an Asana form integration actually work?
Asana handles form intake by turning each submission into a task in the project that owns the form, and Zapier extends that into broader workflows. Section mapping, custom fields, and rules decide where the task lands and what happens next.
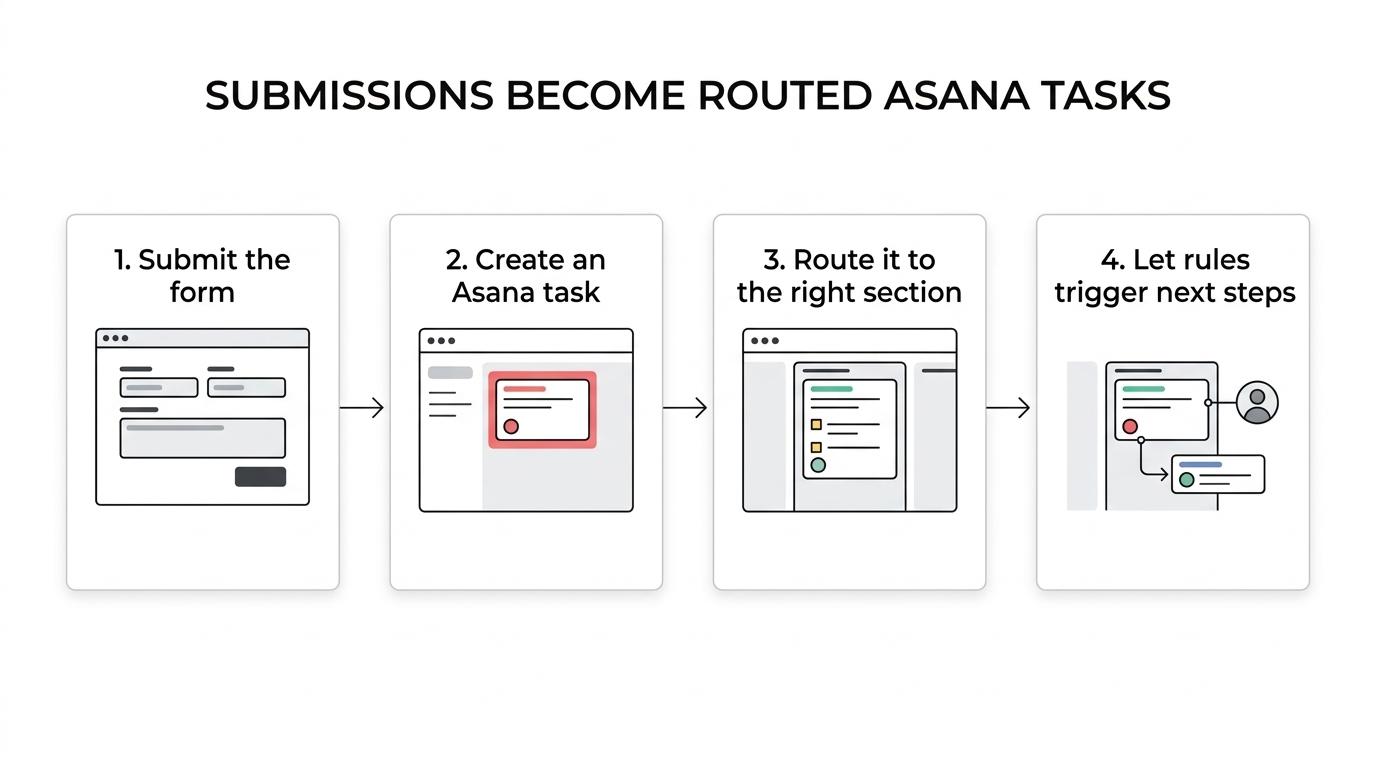
According to the Asana Help Center, when someone submits an Asana form, the response becomes a new task in that same project. Project editors and admins can map submissions into a specific section, which matters more than many teams realize. If your “new intake” section is separate from “needs review” or “assigned,” section mapping becomes the first layer of routing, not just a cosmetic choice.
“Growform routes Asana through Zapier and supports Create Task, Create Subtask, Create Project, Add Task to Section of Project, and Update Task.”
Zapier is what makes the workflow more flexible. Instead of relying only on native Asana forms, you can trigger task creation from another form app, then map fields into task name, description, assignee, due date, project, section, or custom fields. A common misconception is that task creation alone equals automation. It does not. The real speed gain comes from getting the task into the right section with the right metadata already attached.
When should you use Asana forms instead of a third-party form tool?
Use native Asana forms for simple internal intake; use Growform or another front-end form tool when mobile conversion, qualification logic, or tracking matter more than simplicity.
Native Asana forms are a strong fit when the audience is internal or semi-internal: employee requests, client onboarding checklists, creative briefs, support requests, or fulfillment handoffs. The submission becomes a task instantly, and Asana can map it to a section. On higher tiers, Asana supports up to 20 forms per project, which is useful when one project serves several intake paths.
External form tools make more sense when the form must do more work before Asana ever sees the record. That usually means conditional logic, better design control, mobile-first multi-step flows, hidden attribution fields, verification, or embedded experiences on a landing page. Pro tip: do not ask Asana to solve top-of-funnel conversion problems. Asana is excellent at managing work after capture, but it is not a lead-optimized front-end form platform.
What are the best Asana form integrations for faster handoffs?
Growform, Typeform, Jotform, Webflow forms, Unbounce forms, GoHighLevel forms, and Google Forms are the most practical Asana pairings. The best option depends on whether you need internal intake, marketing-site embeds, or lead qualification before task creation.
If your goal is faster handoff, the best integration is the one that creates a clean task with the fewest manual fixes after submission. That means thinking about routing, field mapping, and the source of the form, not just the app name.
- Growform: Best when the form needs multi-step qualification and the Asana handoff runs through Zapier actions like Create Task, Create Subtask, Create Project, Add Task to Section, or Update Task.
- Typeform: A familiar choice for conversational intake, and Zapier publicly includes templates that send new Typeform entries into Asana as tasks.
- Jotform: A practical option when a team already uses it and only needs a standard submit-to-task workflow.
- Webflow forms: Useful when intake happens on a marketing site and the website form needs to create internal Asana work items.
- Unbounce forms: A solid fit for campaign landing pages when the internal team wants each conversion turned into an Asana task.
- GoHighLevel forms: Common for agencies that use GHL for funnel pages but want fulfillment or production managed in Asana.
- Google Forms: Best for low-friction internal collection where design, qualification depth, and attribution are not primary concerns.
The trade-off is straightforward. The more advanced your front-end requirements are, the more likely you are to use Asana through Zapier rather than relying on native Asana forms alone.
How do you connect a form to Asana with Zapier?
The fastest path is to choose a form trigger, connect Asana as the action app, and map the submission into a task. An active Asana account and a valid Zapier connection are required.
Start with the trigger app. That could be a native form tool, a landing page builder, or a multi-step lead form. In Zapier, choose the trigger event for a new submission, then connect the source app account. After that, add Asana as the action app and select the action you actually need, which is usually Create Task.
Next, connect your Asana account. Zapier’s help documentation notes that users add a connection and grant access in Asana. Then choose the workspace, project, and if available, the section where the task should land. This is where many setups get sloppy. If the project is correct but the section is wrong, your team will still treat the handoff as broken.
Finally, map the fields. Use a strong task name, place supporting answers in the description, and send structured values into custom fields where possible. If the source form captures campaign details or source tags, map them too. If you skip that step, reporting gets weaker the moment volume goes up.
“Growform includes 100+ templates and a lead-focused Asana workflow through Zapier, which helps teams ship the form side quickly without rebuilding their handoff logic from scratch.”
How should you map fields, sections, and custom fields in Asana?
Map the minimum data needed for action first, then add reporting fields second. Section mapping should reflect workflow state, while custom fields should reflect properties like lead type, priority, market, or source.
A clean mapping model usually follows three steps. First, define the task title so someone can act on it without opening the full record. Second, map the descriptive content that supports the handoff, like form answers, notes, or preferred contact details. Third, use custom fields for structured attributes that rules and reports will depend on later.
Section mapping deserves extra attention. Asana’s Help Center confirms that project editors and admins can map form submissions to a section. That means you can send “qualified consultation request” to one section and “needs review” to another, if the form or automation path differs. If every submission lands in a generic backlog, you lose one of Asana’s simplest routing tools.
A common mistake is dumping every answer into the task description and skipping custom fields. That looks fine at five submissions a day and fails at fifty. If you want rules, reporting, or filtered views to work, use structured fields for anything operationally important.
Can Asana rules automate the handoff after the task is created?
Yes, Asana rules can automate assignment, status movement, and next-step actions after intake. The key is to use a trigger-and-action design tied to the custom fields and sections you mapped earlier.
Asana’s rules are available in projects and portfolios, and the platform supports both a rules gallery and custom rules. The structure is simple: a trigger happens, then an action follows. That could mean assigning a task when a due date is set, moving it when a field changes, or adding a follower when a priority tag appears.
For intake teams, the smart pattern is to keep the form responsible for capture and initial classification, then let rules handle internal movement. If a submission enters the “New Leads” section with a custom field of “High Intent,” then a rule can assign it to a closer or move it into an SLA queue. If the source is “Partner,” then the action might be different.
Asana’s investor materials also note that custom fields work with forms, rules, reporting, and bundles, and that workflow bundles can package rules, fields, sections, and task templates across processes. That matters when your intake model is repeated across business lines, teams, or regions.
Should each submission create a task, a subtask, or a project in Asana?
Most submissions should create a task. Use subtasks for downstream fulfillment steps and projects only when the intake represents a large, multi-phase body of work.
Tasks are the default because they match the unit of work created by a form submission. A consultation request, a content brief, a launch request, or a lead-review item is usually a single intake object. From there, subtasks can represent child actions like QA, approval, or outreach attempts.
Projects are different. They make sense when one submission kicks off a long process involving several teams, reusable templates, and many deadlines. If a single intake creates a full client onboarding or site build, then “Create Project” can be the right Asana action. If not, it is usually too heavy.
The misconception here is that bigger automation is always better. It is not. If you create a project for every submission when a task would do, your team ends up managing noise instead of work.
How do you test an Asana form integration before sending paid traffic?
Test the happy path, the edge cases, and the failure path. A successful task creation event is only the first checkpoint, not the final one.
Run at least three submission tests. The first should reflect a standard record. The second should include edge-case values like empty optional fields, longer text, or unusual category choices. The third should simulate the highest-priority path, where routing and assignment matter most.
Then verify these details in Asana:
- Task placement: Correct project and correct section
- Field mapping: Title, description, assignee, due date, and custom fields all populate correctly
- Workflow behavior: Rules fire as expected after the task is created
- Operational alerts: Notifications or downstream messages reach the right team
Pro tip: test with the exact hidden fields or tracking parameters you expect in production. Many handoffs look fine in a manual test and fail once live traffic introduces real campaign values, empty parameters, or inconsistent naming.
Is Zapier enough, or do you need a lead routing platform too?
Zapier is enough for many internal handoff workflows, but it is not a replacement for lead distribution software like Boberdoo, Phonexa, or LeadsPedia when you sell or route consumer leads at volume.
If Asana is your internal operating queue, Zapier is often sufficient. It can take submissions from a form tool, create tasks or projects, and keep operational teams moving. That is a good fit for marketing-to-ops handoff, fulfillment queues, appointment prep, or internal review pipelines.
If you are doing ping post, buyer routing, or acceptance logic across multiple lead buyers, that is a different job. Asana is not lead distribution software, and Zapier alone is not the same as a routing engine. If your revenue depends on bid-based distribution, buyer-specific payloads, or real-time acceptance handling, use the proper distribution stack and keep Asana for internal visibility only.
The if-then logic is simple. If the handoff is internal, Asana plus Zapier can be enough. If the handoff is commercial routing across buyers, use a lead distribution platform and treat Asana as a side system, not the core router.
What limits should you know before building an Asana form workflow?
The main limits are workflow depth, form sophistication, and operational scale. Asana intake is strong, but the front-end form experience and the routing logic still need to match the job.
One limit is native form flexibility. Asana forms are designed to create tasks inside a project, which is excellent for intake but narrower than a dedicated form builder used on landing pages. Another limit is operational complexity. Asana rules can automate many internal steps, yet they are still different from a full routing layer that handles commercial lead sales.
There is also a planning limit. Asana can support multiple forms per project on higher tiers, but too many forms feeding one project without a strict field taxonomy creates clutter fast. A common misconception is that adding more forms solves intake sprawl. In practice, strong naming, section logic, and field standards matter more than form count.
What should you check before choosing an Asana form integration?
Choose the setup that matches your intake complexity, not the one with the longest feature list. Faster handoffs come from clean routing and clear ownership.
Before you commit, pressure-test these decision points:
- Audience: Internal requesters usually fit native Asana forms; paid-traffic visitors usually need a stronger front-end form experience.
- Routing model: Decide whether submissions should become tasks, subtasks, or projects before building the automation.
- Section logic: Confirm where each submission type should land on day one.
- Field structure: Use custom fields for anything you will assign, filter, report on, or automate later.
- Automation scope: Use Asana rules for internal next steps, not as a substitute for lead distribution software.
- Testing standard: Require live tests for placement, mapping, rule firing, and notification timing before launch.
That checklist is what separates a form integration that merely “works” from one that actually shortens handoff time.